Difference between revisions of "Windows OS"
| (8 intermediate revisions by the same user not shown) | |||
| Line 11: | Line 11: | ||
<p>Download the Windows installer below for the <font color="red"><i>NEW</i></font color> OpenRocket beta release, saying yes to whatever security prompts your browser presents. Then, double-click on or open the file to run the installer, much like other Windows installers.</p> | <p>Download the Windows installer below for the <font color="red"><i>NEW</i></font color> OpenRocket beta release, saying yes to whatever security prompts your browser presents. Then, double-click on or open the file to run the installer, much like other Windows installers.</p> | ||
| − | == 2022 Beta Release == | + | == Downloading the 2022 Beta Release == |
[https://github.com/openrocket/openrocket/releases/download/release-22.02.beta.01/OpenRocket-22.02.beta.01-Windows.exe <b>OpenRocket 22.02.beta.01 Installer for Windows</b>] | [https://github.com/openrocket/openrocket/releases/download/release-22.02.beta.01/OpenRocket-22.02.beta.01-Windows.exe <b>OpenRocket 22.02.beta.01 Installer for Windows</b>] | ||
| + | |||
| + | While downloading the OpenRocket installer, you may see the following prompts: | ||
| + | |||
| + | <table class="left" style="width:1080px"> | ||
| + | <tr> | ||
| + | <th>What you see</th> | ||
| + | <th>What you do</th> | ||
| + | </tr> | ||
| + | <tr> | ||
| + | <td>'''[[File:01.Download.01.Security_Warning.png|left|frameless|180 px|center]]'''</td> | ||
| + | <td>When you begin downloading the installer, this prompt may appear. If you wish to continue with the download, '''left-click on "DOWNLOAD ANYWAY" to start the installer download'''.</td> | ||
| + | </tr> | ||
| + | <tr> | ||
| + | <td>'''[[File:02.Download.02.01.Trusted_Warning.png|left|frameless|180 px|center]]'''</td> | ||
| + | <td>Then, wait until the download stops.</td> | ||
| + | </tr> | ||
| + | <tr> | ||
| + | <td>'''[[File:03.Download.02.02.Trust_Warning.png|left|frameless|180 px|center]]'''</td> | ||
| + | <td>After the download stops, this prompt may appear. If you wish to finish the download, ''open the additional options by left-clicking on the three dots''. Then, '''left-click on "Keep" to save the OpenRocket installer'''.</td> | ||
| + | </tr> | ||
| + | <tr> | ||
| + | <td>'''[[File:04.Download.02.03.Trust_Warning.png|left|frameless|180 px|center]]'''</td> | ||
| + | <td>Then, ''Windows'' wants you to be sure that you really want to keep the downloaded file. So, if you wish to keep the OpenRocket installer, then '''left-click the "Show more" option'''.</td> | ||
| + | </tr> | ||
| + | <tr> | ||
| + | <td>'''[[File:05.Download.02.04.Trust_Warning.png|left|frameless|180 px|center]]'''</td> | ||
| + | <td>When you do so, this prompt should appear. If you wish to finish saving the downloaded file, then '''left-click on "Keep anyway" to complete the process of saving the OpenRocket installer'''.</td> | ||
| + | </tr> | ||
| + | </table> | ||
| + | |||
| + | * Screenshots may vary with the Windows operating system version installed on your device; the screenshots shown above are those of Windows 11. | ||
| + | |||
| + | == Installing the 2022 Beta Release == | ||
After the OpenRocket installer is downloaded, OpenRocket may be installed by doing the following: | After the OpenRocket installer is downloaded, OpenRocket may be installed by doing the following: | ||
| Line 24: | Line 57: | ||
<tr> | <tr> | ||
<td>'''[[File:Install_Windows_Prompt_01.png|left|frameless|180 px|center]]'''</td> | <td>'''[[File:Install_Windows_Prompt_01.png|left|frameless|180 px|center]]'''</td> | ||
| − | <td> | + | <td>'''Double-left-click on or open the installation file to run the installer''' (to start the ''instal4j'' installation wizard), displaying the progress of the file transfer.</td> |
</tr> | </tr> | ||
<tr> | <tr> | ||
<td>'''[[File:Install_Windows_Prompt_02.png|left|frameless|180 px|center]]'''</td> | <td>'''[[File:Install_Windows_Prompt_02.png|left|frameless|180 px|center]]'''</td> | ||
| − | <td>After the file transfer is complete, a warning screen will appear asking for your permission to allow this application to make changes to your device. <u>To continue with the installation</u>, | + | <td>After the file transfer is complete, a warning screen will appear asking for your permission to allow this application to make changes to your device. <u>To continue with the installation</u>, '''left-click on the "Yes" button'''.</td> |
</tr> | </tr> | ||
<tr> | <tr> | ||
<td>'''[[File:Install_Windows_Prompt_03.png|left|frameless|180 px|center]]'''</td> | <td>'''[[File:Install_Windows_Prompt_03.png|left|frameless|180 px|center]]'''</td> | ||
| − | <td>The | + | <td>The ''Welcome'' screen for the OpenRocket installation will then appear, giving you the option of choosing a different directory in which to save the OpenRocket files. <u>Unless you are familiar with directory structures</u>, you should '''leave "Yes..." selected and left-click the "Next" button'''.</td> |
</tr> | </tr> | ||
<tr> | <tr> | ||
<td>'''[[File:Install_Windows_Prompt_04.png|left|frameless|180 px|center]]'''</td> | <td>'''[[File:Install_Windows_Prompt_04.png|left|frameless|180 px|center]]'''</td> | ||
| − | <td>The next step is to set the file extension associations. The "OpenRocket Rocket Files (*ork)" box should already be checked, so, <u>unless you want to change the file associations</u>, you can just | + | <td>The next step is to set the file extension associations. The "OpenRocket Rocket Files (*ork)" box should already be checked, so, <u>unless you want to change the file associations</u>, you can just '''left-click the "Next" box'''.</td> |
</tr> | </tr> | ||
<tr> | <tr> | ||
| Line 44: | Line 77: | ||
<tr> | <tr> | ||
<td>'''[[File:Install_Windows_Prompt_06.png|left|frameless|180 px|center]]'''</td> | <td>'''[[File:Install_Windows_Prompt_06.png|left|frameless|180 px|center]]'''</td> | ||
| − | <td>After the installation has finished, the final prompt appears, stating that OpenRocket can be launched by selecting the installed icons. | + | <td>After the installation has finished, the final prompt appears, stating that OpenRocket can be launched by selecting the installed icons. '''Left-click the "Finish" button''' to return to the ''Desktop''</td> |
</tr> | </tr> | ||
</table> | </table> | ||
| − | + | * Screenshots may vary with the Windows operating system version installed on your device; the screenshots shown are those of Windows 11. | |
=== Windows 2022 Beta 1 After Installation Checks === | === Windows 2022 Beta 1 After Installation Checks === | ||
| − | ''Contrary to what the installer states'', the 2022 Beta 1 installer '''does not''' provide a shortcut on the desktop, taskbar, or | + | ''Contrary to what the installer states'', the 2022 Beta 1 installer '''does not''' provide a shortcut on the desktop, taskbar, or start menu. After running the installer, you may create a desktop shortcut by right-clicking on a blank area of the desktop, and then selecting ''New → Shortcut'' in the pop-up window. Within the ''Create Shortcut'' dialog box, on the ''Browse'' line, navigate to where the installer copied the files (typically "C:\Program Files\OpenRocket") and select "OpenRocket.exe" '''NOT''' "OpenRocket.jar", then '''click ''Okay'' to move on''', <u>name the shortcut</u>, and <b>click ''Finish''</b>. |
<table class="left" style="width:1080px"> | <table class="left" style="width:1080px"> | ||
<tr> | <tr> | ||
<td>'''[[File:Shortcut.Show-Exe.png|left|frameless|256 px|center]]'''</td> | <td>'''[[File:Shortcut.Show-Exe.png|left|frameless|256 px|center]]'''</td> | ||
| − | <td>To confirm the proper creation of the shortcut, left-click on the shortcut and select ''Properties''. The shortcut tab should open, and | + | <td>To confirm the proper creation of the shortcut, left-click on the shortcut and select ''Properties''. The shortcut tab should open, and '''MUST''' direct you to the OpenRocket.exe ''Target'' file, like this.</td> |
</tr> | </tr> | ||
</table> | </table> | ||
Latest revision as of 08:38, 19 March 2022
Download the Windows installer below for the NEW OpenRocket beta release, saying yes to whatever security prompts your browser presents. Then, double-click on or open the file to run the installer, much like other Windows installers.
Downloading the 2022 Beta Release[edit]
OpenRocket 22.02.beta.01 Installer for Windows
While downloading the OpenRocket installer, you may see the following prompts:
| What you see | What you do |
|---|---|
| When you begin downloading the installer, this prompt may appear. If you wish to continue with the download, left-click on "DOWNLOAD ANYWAY" to start the installer download. | |
| Then, wait until the download stops. | |
| After the download stops, this prompt may appear. If you wish to finish the download, open the additional options by left-clicking on the three dots. Then, left-click on "Keep" to save the OpenRocket installer. | |
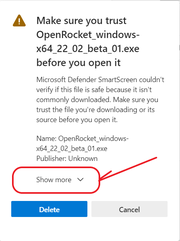
| Then, Windows wants you to be sure that you really want to keep the downloaded file. So, if you wish to keep the OpenRocket installer, then left-click the "Show more" option. | |
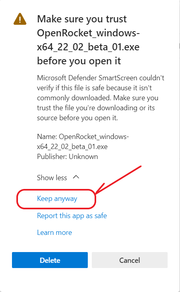
| When you do so, this prompt should appear. If you wish to finish saving the downloaded file, then left-click on "Keep anyway" to complete the process of saving the OpenRocket installer. |
- Screenshots may vary with the Windows operating system version installed on your device; the screenshots shown above are those of Windows 11.
Installing the 2022 Beta Release[edit]
After the OpenRocket installer is downloaded, OpenRocket may be installed by doing the following:
| What you see | What you do |
|---|---|
| Double-left-click on or open the installation file to run the installer (to start the instal4j installation wizard), displaying the progress of the file transfer. | |
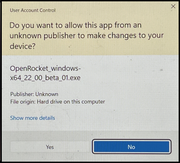
| After the file transfer is complete, a warning screen will appear asking for your permission to allow this application to make changes to your device. To continue with the installation, left-click on the "Yes" button. | |
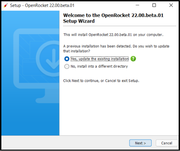
| The Welcome screen for the OpenRocket installation will then appear, giving you the option of choosing a different directory in which to save the OpenRocket files. Unless you are familiar with directory structures, you should leave "Yes..." selected and left-click the "Next" button. | |
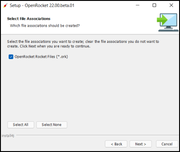
| The next step is to set the file extension associations. The "OpenRocket Rocket Files (*ork)" box should already be checked, so, unless you want to change the file associations, you can just left-click the "Next" box. | |
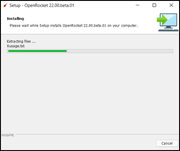
| As the OpenRocket application is installed, the installation progress is displayed. | |
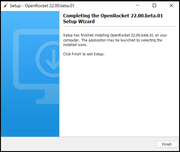
| After the installation has finished, the final prompt appears, stating that OpenRocket can be launched by selecting the installed icons. Left-click the "Finish" button to return to the Desktop |
- Screenshots may vary with the Windows operating system version installed on your device; the screenshots shown are those of Windows 11.
Windows 2022 Beta 1 After Installation Checks[edit]
Contrary to what the installer states, the 2022 Beta 1 installer does not provide a shortcut on the desktop, taskbar, or start menu. After running the installer, you may create a desktop shortcut by right-clicking on a blank area of the desktop, and then selecting New → Shortcut in the pop-up window. Within the Create Shortcut dialog box, on the Browse line, navigate to where the installer copied the files (typically "C:\Program Files\OpenRocket") and select "OpenRocket.exe" NOT "OpenRocket.jar", then click Okay to move on, name the shortcut, and click Finish.
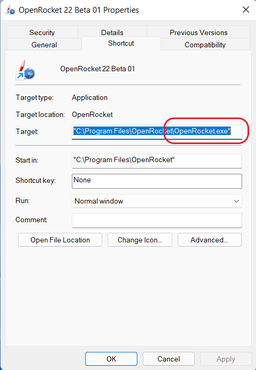
| To confirm the proper creation of the shortcut, left-click on the shortcut and select Properties. The shortcut tab should open, and MUST direct you to the OpenRocket.exe Target file, like this. |
Alternatively, if you are using Windows 11, for easy access to OpenRocket in the future, after installing OpenRocket, navigate to the executable OpenRocket.exe file (usually located in the "C:\ProgramFiles\OpenRocket” folder), then right click on the "OpenRocket.exe" file (NOT the “OpenRocket.jar” file), and create a shortcut, pin OpenRocket to the taskbar, and/or pin OpenRocket to the start menu, as you wish.
2015 Version 15.03[edit]
OpenRocket 15.03 Installer for Windows
Please note: This installer does not provide a shortcut on the desktop or the start menu. After installing, the actual executable file for the application is installed into your user/AppData/Local/OpenRocket folder. Open that folder in Windows Explorer, right click the "OpenRocket.exe" file (NOT the “OpenRocket.jar” file), and create a shortcut, pin it to the taskbar and/or pin it in the start menu, as you desire, for easy access to it in the future.


