Difference between revisions of "Downloading & Installing"
| Line 25: | Line 25: | ||
=== Close All Instances of OpenRocket === | === Close All Instances of OpenRocket === | ||
| − | By default, all beta | + | By default, all beta releases of OpenRocket install to the same location on your device; beta releases even share preference and use files with version 15.03. Because of this, if OpenRocket is open when you attempt to install an updated beta release, the installation may not update all of the files needed for OpenRocket to function correctly. |
''Before installing an update'', you '''MUST''' close all open instances of OpenRocket. | ''Before installing an update'', you '''MUST''' close all open instances of OpenRocket. | ||
| − | === Uninstall Prior Beta | + | === Uninstall Prior OpenRocket Beta Releases === |
| − | As described above, by default, all beta | + | As described above, by default, all beta releases of OpenRocket install to the same location on your device. Although not expressly required, it is suggested that all previously installed OpenRocket beta releases be uninstalled before installing the updated beta release. This is not required, but is suggested to ensure the proper function of OpenRocket through the completion of beta testing. |
== 2022 Beta 5 After-Installation Checks == | == 2022 Beta 5 After-Installation Checks == | ||
Revision as of 08:03, 28 September 2022
Overview
Coming Soon. . . OpenRocket Beta 5 will soon be available for download.
OpenRocket Beta 5 will be available for Windows, macOS and Linux. The easiest way to get OpenRocket up and running is to download and install one of the packaged installers. The Packaged Installers come with everything needed, including the correct version of Java; you will not need to install, update or downgrade Java on your device to run them.
For security reasons, beginning with the release of 22.02 Beta 2, download files for all available versions and releases of OpenRocket are now on, and should be downloaded from the official OpenRocket website at:
2022 Beta 5 Pre-Installation Procedures
A few users have reported difficulties with installing new versions of OpenRocket, and some of these relate to pre-installation procedures. Before beginning the installation of OpenRocket, the following actions should be undertaken.
Close All Instances of OpenRocket
By default, all beta releases of OpenRocket install to the same location on your device; beta releases even share preference and use files with version 15.03. Because of this, if OpenRocket is open when you attempt to install an updated beta release, the installation may not update all of the files needed for OpenRocket to function correctly.
Before installing an update, you MUST close all open instances of OpenRocket.
Uninstall Prior OpenRocket Beta Releases
As described above, by default, all beta releases of OpenRocket install to the same location on your device. Although not expressly required, it is suggested that all previously installed OpenRocket beta releases be uninstalled before installing the updated beta release. This is not required, but is suggested to ensure the proper function of OpenRocket through the completion of beta testing.
2022 Beta 5 After-Installation Checks
Verify the Installed Beta Release Number
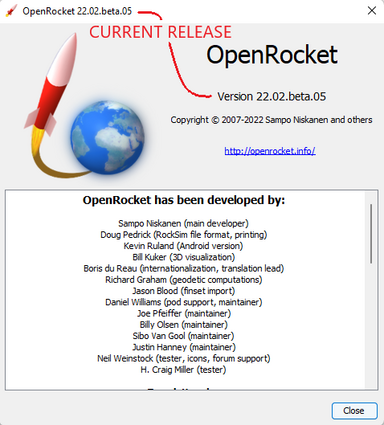
A few users have reported that new installations of OpenRocket are not functioning correctly, only to find out that the wrong beta release was installed. After your installation is complete, and before doing anything else, verify that you actually installed OpenRocket.22.02.beta.05 by undertaking the following steps:
| Step | What You Should See |
|---|---|
| 1 | If the beta release number shown in both images below is not OpenRocket.22.02.beta.05, then you have installed the wrong release of the OpenRocket beta. Uninstall that release, download the new beta release, and try again. |
| Splash Screen | |
| Help → About | |
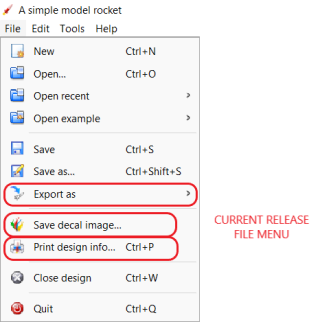
| 2 | If the circled icons shown in the image below are different that yours, then you have installed the wrong beta release of OpenRocket. Uninstall that release, download the new beta release, and try again. |
| Component Icons | |
| File Menu Icons |
Check Settings
If everything looks good there, let's check settings.
| Setting | What You Should Do |
|---|---|
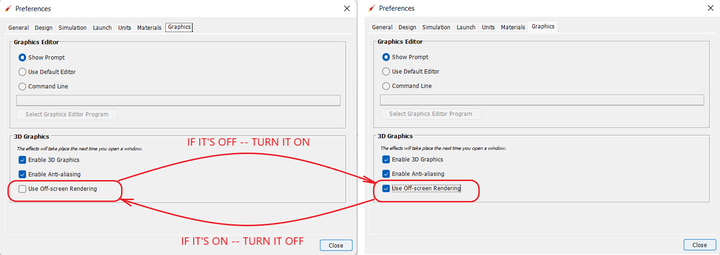
| Off-screen Rendering | Some users have reported that the rocket shown in the design window is not full-size. This can occur if the off-screen rendering setting is not correct for your device. Using the Three-stage rocket example packaged with OpenRocket, this is what the problem looks like: |
| Too small | |
| Correct size | |
| Solution | In most instances, the solution is changing a setting in your preferences. You can find that setting here: Edit → Preferences → Graphics. And, you toggle the Use Off-screen Rendering setting. If it's off, then you turn it on. If it's on, then you turn it off. After changing this setting, you must exit and restart OpenRocket for the change to take effect. |
| Experience has shown that those who use Apple Silicon Macs should uncheck this box, and those who use Windows should check this box. But, your OS platform may differ. If this does not correct the issue, contact development. |


