Difference between revisions of "MacOS"
Hcraigmiller (talk | contribs) (Created page with "=== <u>macOS</u> === Download the DiskImage file for the version of OpenRocket that you want, open it, and you'll see a big icon for OpenRocket, and a shortcut to your Applic...") |
Hcraigmiller (talk | contribs) |
||
| (7 intermediate revisions by 2 users not shown) | |||
| Line 1: | Line 1: | ||
| − | === < | + | <div style="text-align: center;"> |
| + | <div style="float: left;"> ← [[Introduction|Go to Introduction]]</div> | ||
| + | <div style="float: right;">[[Getting Started|Getting Started →]]</div> | ||
| + | [[Main Page|↑ Back to Main Page]] | ||
| + | </div> | ||
| + | ---- | ||
| + | |||
| + | == 2022 Beta Release == | ||
| + | [https://github.com/openrocket/openrocket/releases/download/release-22.02.beta.01/OpenRocket-22.02.beta.01-macOS.dmg <b>OpenRocket-22.02.beta.01 Installer for macOS</b>] | ||
| + | |||
| + | Download the above disk image file, saying yes to whatever security prompts your browser presents. Once the file is downloaded, open it up either using the browser's "Open" function, or double-click it in the Finder. This will mount the image and open up a window with a single icon. Then follow the instructions below. | ||
| + | |||
| + | NOTE: these instructions and screenshots are for macOS Monterey, but any recent-vintage macOS should behave similarly. | ||
| + | |||
| + | <table class="left" style="width:840px"> | ||
| + | <tr> | ||
| + | <th>What you see</th> | ||
| + | <th>What to do</th> | ||
| + | </tr> | ||
| + | <tr> | ||
| + | <td>'''[[File:mac22beta_install_installer_window.png|left|frameless|200 px|center]]'''</td> | ||
| + | <td><b>Double-left-click on the installer file to start the <i>instal4j</i> installation wizard</b>, displaying the progress of the file transfer.</td> | ||
| + | </tr> | ||
| + | <tr> | ||
| + | <td>'''[[File:mac22beta_install_security1.png|left|frameless|200 px|center]]'''</td> | ||
| + | <td><b>Double-click the "OK" button</b> in the security dialog.</td> | ||
| + | </tr> | ||
| + | <tr> | ||
| + | <td>'''[[File:mac22beta_install_security_pref.png|left|frameless|200 px|center]]'''</td> | ||
| + | <td><b>Open System Preferences and select "Security & Privacy"</b>, which will display the panel at left. <b>At the bottom right, click the "Open Anyway" button</b>.</td> | ||
| + | </tr> | ||
| + | <tr> | ||
| + | <td>'''[[File:mac22beta_install_security2.png|left|frameless|200 px|center]]'''</td> | ||
| + | <td><b>In the next security dialog, click the "Open" button</b>. | ||
| + | </tr> | ||
| + | <tr> | ||
| + | <td>'''[[File:mac22beta_install_start.png|left|frameless|200 px|center]]'''</td> | ||
| + | <td>After a brief progress window, you should at long last get to the installer. <b>At the first screen, click "Next >"</b>. | ||
| + | </tr> | ||
| + | <tr> | ||
| + | <td>'''[[File:mac22beta_install_location.png|left|frameless|200 px|center]]'''</td> | ||
| + | <td><b>Select where to put the app. Normally the default "/Applications" is what you want. Click "Next".</b> | ||
| + | </tr> | ||
| + | <tr> | ||
| + | <td>'''[[File:mac22beta_install_associations.png|left|frameless|200 px|center]]'''</td> | ||
| + | <td><b>Select whether you want this app to be associated with all ".ork" files.</b> <i>Note this doesn't work correctly in Beta1.</i> But it can't hurt to leave it checked. <b>Click "Next >".<b> | ||
| + | </tr> | ||
| + | <tr> | ||
| + | <td>'''[[File:mac22beta_install_finished.png|left|frameless|200 px|center]]'''</td> | ||
| + | <td><b>You're done! Well, almost. Click "Finish".</b> | ||
| + | </tr> | ||
| + | <tr> | ||
| + | <td>'''[[File:mac22beta_install_eject.png|left|frameless|200 px|center]]'''</td> | ||
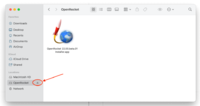
| + | <td><b>In a Finder window, eject the installer image.</b> You may then delete the installer image from your Downloads folder. | ||
| + | </tr> | ||
| + | </table> | ||
| + | You may now launch the app using any of the normal methods. Have fun! | ||
| + | |||
| + | == 2015 Version 15.03 == | ||
Download the DiskImage file for the version of OpenRocket that you want, open it, and you'll see a big icon for OpenRocket, and a shortcut to your Application folder. Drag OpenRocket to the Application Folder, let it finish copying, and you're done. | Download the DiskImage file for the version of OpenRocket that you want, open it, and you'll see a big icon for OpenRocket, and a shortcut to your Application folder. Drag OpenRocket to the Application Folder, let it finish copying, and you're done. | ||
| − | + | [https://github.com/openrocket/openrocket/releases/download/release-15.03/OpenRocket-15.03.dmg OpenRocket 15.03 Application DiskImage for macOS]<br> | |
| − | < | + | |
| + | <br> | ||
| + | |||
| + | ---- | ||
| + | |||
| + | <div style="text-align: center;"> | ||
| + | <div style="float: left;">← [[FAQ|Go to Frequently Asked Questions]]</div> | ||
| + | <div style="float: right;">[[Tips|Go to Tips and Tricks →]]</div> | ||
| + | [[Downloading & Installing|↑ Back to Downloading & Installing]] | ||
| + | </div> | ||
Latest revision as of 00:36, 26 February 2022
2022 Beta Release[edit]
OpenRocket-22.02.beta.01 Installer for macOS
Download the above disk image file, saying yes to whatever security prompts your browser presents. Once the file is downloaded, open it up either using the browser's "Open" function, or double-click it in the Finder. This will mount the image and open up a window with a single icon. Then follow the instructions below.
NOTE: these instructions and screenshots are for macOS Monterey, but any recent-vintage macOS should behave similarly.
| What you see | What to do |
|---|---|
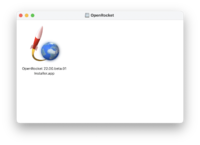
| Double-left-click on the installer file to start the instal4j installation wizard, displaying the progress of the file transfer. | |
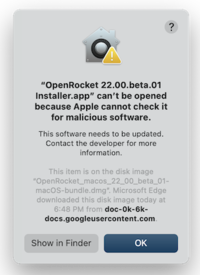
| Double-click the "OK" button in the security dialog. | |
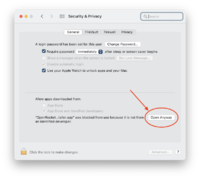
| Open System Preferences and select "Security & Privacy", which will display the panel at left. At the bottom right, click the "Open Anyway" button. | |
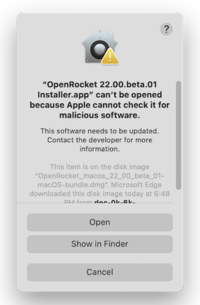
| In the next security dialog, click the "Open" button. | |
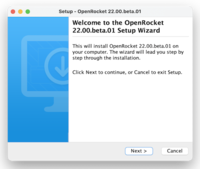
| After a brief progress window, you should at long last get to the installer. At the first screen, click "Next >". | |
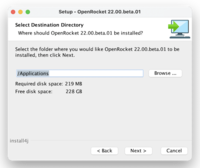
| Select where to put the app. Normally the default "/Applications" is what you want. Click "Next". | |
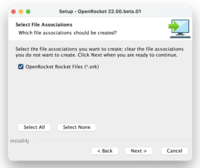
| Select whether you want this app to be associated with all ".ork" files. Note this doesn't work correctly in Beta1. But it can't hurt to leave it checked. Click "Next >". | |
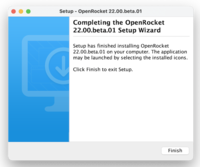
| You're done! Well, almost. Click "Finish". | |
| In a Finder window, eject the installer image. You may then delete the installer image from your Downloads folder. |
You may now launch the app using any of the normal methods. Have fun!
2015 Version 15.03[edit]
Download the DiskImage file for the version of OpenRocket that you want, open it, and you'll see a big icon for OpenRocket, and a shortcut to your Application folder. Drag OpenRocket to the Application Folder, let it finish copying, and you're done.
OpenRocket 15.03 Application DiskImage for macOS
