Difference between revisions of "Downloading & Installing"
Hcraigmiller (talk | contribs) |
Hcraigmiller (talk | contribs) |
||
| Line 73: | Line 73: | ||
<table class="left" style="width:840px"> | <table class="left" style="width:840px"> | ||
<tr> | <tr> | ||
| − | <th>Prompt</th> | + | <th>Displayed Prompt</th> |
<th>Action Required</th> | <th>Action Required</th> | ||
</tr> | </tr> | ||
Revision as of 03:03, 23 February 2022
|
The current User's Guide is very much a work in progress, any help would be greatly appreciated! |
Overview
OpenRocket is available for Windows, macOS and Linux. The easiest way to get OpenRocket up and running is to download and install one of the packaged installers. The Packaged Installers for OpenRocket come with everything needed. You don't need to install, update or downgrade Java on your machine to run them.
Download Files
| File Type | OpenRocket 22.00.beta.01 | OpenRocket 15.03 |
|---|---|---|
(INACTIVE UNTIL RELEASE DATE) |
||
| • Windows packaged installer | OpenRocket-22.00.beta.01-installer.exe | OpenRocket-15.03-installer.exe |
| • macOS packaged installer | OpenRocket-22.00.beta.01.dmg | OpenRocket-15.03.dmg |
| • Linux packaged installer | OpenRocket-22.00.beta.01.AppImage | OpenRocket-15.03.AppImage |
| • .jar | OpenRocket-22.00.beta.01.jar | OpenRocket-15.03.jar |
| • Source code (.zip) | OpenRocket-22.00.beta.01.zip | OpenRocket-15.03.zip |
| • Source code (.tar.gz) | OpenRocket-22.00.beta.01.tar.gz | OpenRocket-15.03.tar.gz |
Installers
Windows
Download the Windows installer for the version of OpenRocket that you want, then double-click on or open the file to run the installer, much like other Windows installers.
2022 Beta Release
OpenRocket 22.00.beta.01 Installer for Windows (INACTIVE UNTIL RELEASE DATE)
After the OpenRocket installer is downloaded, OpenRocket may be installed by doing the following:
| Displayed Prompt | Action Required |
|---|---|
Double-left-click the installation file to start the instal4j installation wizard, displaying the progress of the file transfer. |
|
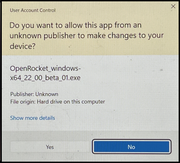
After the file transfer is complete, a warning screen will appear asking for your permission to allow this application to make changes to your device. To continue with the installation, left-click on the "Yes" button. |
|
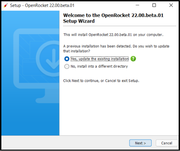
The Welcome screen for the OpenRocket installation will then appear, giving the option of choosing a different directory in which to save the OpenRocket files. Unless you are familiar with directory structures, you should leave "Yes..." selected and left-click the "Next" button. |
|
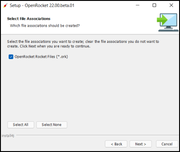
| The next step is to set the file associations. The "OpenRocket Rocket Files (*ork)" box should already be checked, so, unless you want to change the file associations, you can just left-click the "Next" box. | |
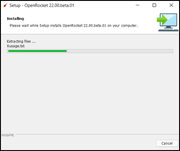
| As the OpenRocket application is installed, the installation progress is displayed. | |
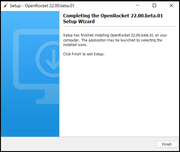
| After the installation has finished, the final prompt appears, stating that OpenRocket can be launched by selecting the installed icons. Left-click the "Finish" button to return to the Desktop |
* Screenshots may vary with the Windows operating system version installed on your device; the screenshots shown are from Windows 11.
Special notice: At the present time, this installer does not create a shortcut on the desktop or the start menu. After installing, the executable file for the application (OpenRocket.exe) is located in the "C:\ProgramFiles\OpenRocket” folder. For easy access to OpenRocket in the future, you can open that folder in Windows Explorer, right click the "OpenRocket.exe" file (NOT the “OpenRocket.jar” file), and create a shortcut, pin it to the taskbar, and/or pin it to the start menu, as you wish.
2015 Version 15.03
OpenRocket 15.03 Installer for Windows
Please note: This installer does not provide a shortcut on the desktop or the start menu. After installing, the actual executable file for the application is installed into your user/AppData/Local/OpenRocket folder. Open that folder in Windows Explorer, right click the "OpenRocket.exe" file (NOT the “OpenRocket.jar” file), and create a shortcut, pin it to the taskbar and/or pin it in the start menu, as you desire, for easy access to it in the future.
macOS
Download the DiskImage file for the version of OpenRocket that you want, open it, and you'll see a big icon for OpenRocket, and a shortcut to your Application folder. Drag OpenRocket to the Application Folder, let it finish copying, and you're done.
OpenRocket 22.00.beta.01 Application DiskImage for macOS (INACTIVE UNTIL RELEASE DATE)
OpenRocket 15.03 Application DiskImage for macOS
Linux
Before beginning, you will need to have the FUSE filesystem installed; most distributions have it installed by default. Download the AppImage file for the version of OpenRocket that you want, and run it by double-clicking, or from the command line.
OpenRocket 22.00.beta.01 AppImage for Linux (INACTIVE UNTIL RELEASE DATE)
OpenRocket 15.03 AppImage for Linux
Special note: The AppImage is the preferred way to obtain OpenRocket for Linux, as OpenRocket 22.00.beta.01 requires Java 11 (LTS) and OpenRocket 15.03 requires Java 8 (LTS), neither of which is installed by default in most other distributions.
Running a "JAR" File
Java is a programming language and computing platform that powers a large share of today’s digital world by providing a reliable platform upon which services and applications can be built. OpenRocket is one of these, and it will not function unless you have Java installed.
Java is enhanced to improve performance, stability and security of the Java applications that run on your machine, and a new feature-release is issued every six months. And, every three years, an issued release is designated as Long-Term Support (LTS) and receives quarterly security, stability, and performance updates only, meaning the version does not changed when updated. To ensure the broadest possible compatibility and stability of the application, OpenRocket is intended to be used with Java LTS versions.
The OpenRocket installers are packaged with the correct version of Java for the OpenRocket version being installed, such that everything that OpenRocket needs to function correctly is installed during the installation process; the Java version installed on your device is ignored. So, the easiest and most reliable way to use OpenRocket is to skip the .jar installation, and, instead, use the packaged installers for your device. The use of a .jar version is not recommended.
2022 Beta Release
Although Java 17 (LTS) was released in September of 2021, beta development had progressed too far to provide for its full compatibility. The 2022 beta release of OpenRocket requires the Java 11 (LTS) platform to fully function correctly; OpenRocket 2022 beta releases are not intended to run with any other version of Java at this time.
- Download OpenRocket 22.00.beta.01.jar (INACTIVE UNTIL RELEASE DATE)
- Copy it to a convenient folder.
- Make the .jar file executable (if needed).
- Start OpenRocket by either double-clicking the .jar file, or right-clicking the .jar file and selecting "Open".
You man also start the .jar OpenRocket from the command line, replacing "/path_to/" with the path to the .jar file on your system:
java -jar /path_to/OpenRocket-22.00.beta.01.jar
Version 15.03
OpenRocket 15.03 requires the Java 8 (LTS) platform; OpenRocket 15.03 may not function correctly using any other version of Java.
- Download OpenRocket-15.03.jar
- Copy it to a convenient folder.
- Make the .jar file executable (right-click on .jar file, select "Properties", go to the Permissions tab and check the "Allow executing file as program" box).
- Start OpenRocket by either double-clicking the .jar file, or right-clicking the .jar file, and selecting "Open with Sun Java6 Runtime".
If the default is set to open with the Archive Manager, then right-click, select "Open with other application", then select "Open with Sun Java6 Runtime", and check the box to make that the default. In future, it should be possible to just double-click to start OpenRocket.
Alternatively you may start OpenRocket from the command line:
java -jar OpenRocket-15.03.jar
Or, if you are not currently in the same directory as the .jar file, replace '/path_to/' by the appropriate path on your system:
java -jar /path_to/OpenRocket-15.03.jar
Ubuntu/Debian Repository
Note that if you install OpenRocket from a repository as in the following instructions, it will likely not work since it requires an older version of Java than is commonly distributed today. Our next release is targeting newer versions of Java, and hopefully this will become a useful approach to installing again at that time.
If you are running a recent version of Ubuntu or Debian, then OpenRocket can be easily installed using the Ubuntu Software Center or Synaptic (etc.). Please note that the version in the distribution repository may not be the latest version. Alternatively you may install OpenRocket from the command line:
sudo apt-get install openrocket
or
sudo apt install openrocket
To start OpenRocket, simply select it from the Applications menu.

