Difference between revisions of "Basic Flight Simulation"
| Line 133: | Line 133: | ||
<li>Local wind speed, direction, gust mismatch from simulation</li> | <li>Local wind speed, direction, gust mismatch from simulation</li> | ||
<li>Varying wind speed at altitude, or wind shift during flight</li> | <li>Varying wind speed at altitude, or wind shift during flight</li> | ||
| − | <li>Performance under stress of | + | <li>Performance under stress of real-world components (fin flutter, etc.)</li> |
<li>Imperfect match of simulated model to real model</li> | <li>Imperfect match of simulated model to real model</li> | ||
</ul> | </ul> | ||
Revision as of 16:34, 12 January 2021
|
The current User's Guide is very much a work in progress, any help would be greatly appreciated! |
Basic Flight Simulation
In this section we'll take a quick look at running a basic Flight Simulation.
Why simulate?
Simulations are often used by mid- and high-power rocketeers to determine what altitude a rocket and motor combination will attain, in order to keep it below the maximum launch waiver altitude, or below cloud cover, or just so it won't disappear miles downwind on the breeze.
They're also often used to determine how long an ejection delay needs to be, if you're using motor ejection.
You may not have simulated flights on your Estes A, B and C motors, but once you start buying and assembling some of the many motors you could choose for mid- or high-power rocketry, you'll need to simulate regularly.
OpenRocket can do the basic simulations for altitude, velocity off the rod/rail, optimum delay with just a few clicks. But if you'd like to get more deeply into simulation, OpenRocket can graph flight parameters, take local wind speed and direction into account, and a lot more.
If you already know how run basic simulations, you can jump to the next section.
Running a simple simulation
The Flight Simulations window
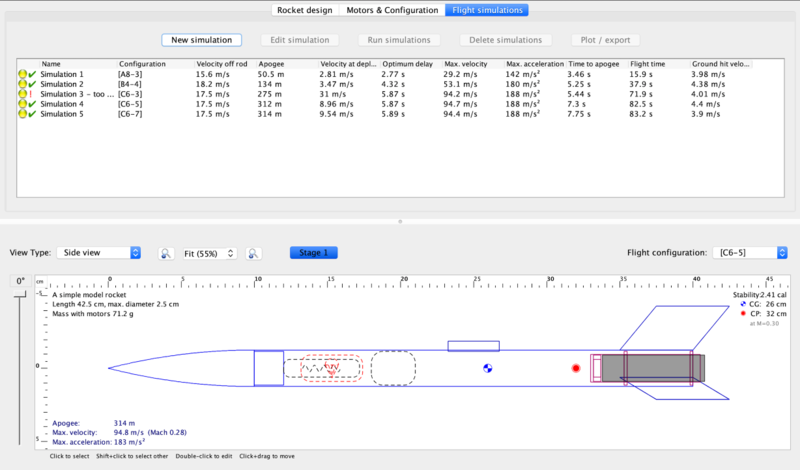
Below you'll see a picture of the Flight Simulations window. We're using the A Simple Model Rocket example here, and it includes the list of simulations pictured.
In the Flight Simulations window, you'll see the simulations listed, initially in Name order. Note that the second column is "Configuration" - the name of the configuration used in the sim, usually named for the rocket motor used in that configuration. The remaining values in the simulation's row are calculated by "running" the simulation. You can run one simulation by selecting a sim and clicking the Run simulations button:
...or run them all at once by selecting more than one...
...or run them in any combination you choose.
Simulation Results
Below you'll see the Simulation Results. Note that the indicator at each simulation has turned green, and that beside every working simulation, you'll see a check mark.
Note also that Simulation 3 has an exclamation point instead of a check mark. This is because the simulation reveals that the motor delay is so short that the rocket will be moving very fast when the parachute comes out. This will usually cause severe damage to a rocket - called a "zipper", where the pulled-taut shock cord cuts a rough slot in the tube as the chute deploys while the rocket continues to move rapidly forward.
OpenRocket can detect several conditions which will mark a simulation as non-working. For example:
- Too slow off launch rod - unstable launch
- Too short a delay - early deploy of chute, zipper, damage or separation likely
- Too long a delay - late deploy of chute, zipper, damage, separation or hard ground-hit likely
- Ground-hit velocity too high - damage, and potential danger to ground personnel
These are common failure conditions, but are not intended to be an exhaustive list.
Motors & Configuration
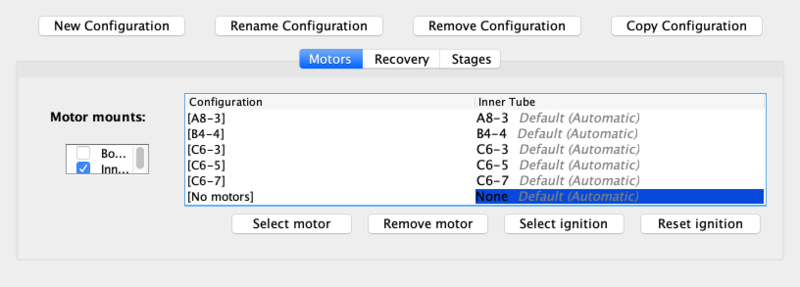
To simulate a new motor (or motors) you'll start a New Configuration, by clicking the button with that name. Next to that button are buttons that let you Rename Configuration, Remove Configuration (i.e. delete it from your project), and Copy Configuration. They work about like you'd imagine, on the configuration you've selected.
Below, you see the Motors & Configuration tab for A Simple Model Rocket, just after clicking New Configuration
From here, you can choose to Select motor, Remove motor, Select ignition, or Reset ignition.
Notice that in the Motor mounts section of the Motors & Configuration panel, you can see that the Inner Tube is selected as the single motor mount tube.
More complex models with more motor mount tubes offer you the chance to fly with multiple motors in Clusters and Airstarts. The example model rockets in the File menu illustrate these multiple motor configurations. To learn more about how multiple motors are handled, we suggest you load one of these example models and inspect the simulation and motor mount tube settings.
Select motor
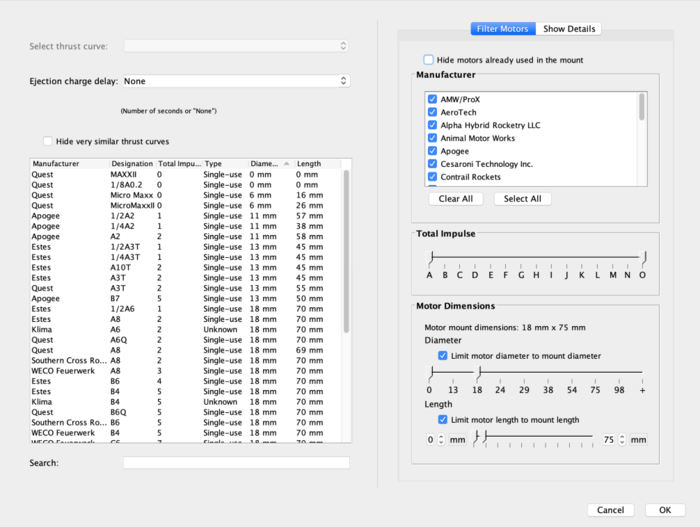
Clicking Select motor brings up the Motor Selection panel, as shown below.
From this panel, you can select from many different motors, from many different manufacturers. There are a BUNCH of motors listed, but don't worry: the gadgets on this panel can help make your selection much easier.
Ignore Ejection charge delay for now. It is one of the most important settings on the page, but we'll come back to it.
On the left, we see a list of the motors available to OpenRocket, given the filter settings on this page. The list can be sorted by any column, by clicking the column headers.
Below the list of motors is a Search box, which allows you to do a free-text search against the current list of motors.
On the right, the Hide motors already used in the mount checkbox will help you avoid creating multiple simulations for the same motor. One is usually enough.
In the Manufacturer section, you can filter to show only motors from particular manufacturers. This is especially important if you're using reloadable rocket motors: if you want to fly, for example, an AeroTech reloadable motor, only AeroTech reloads will be of use to you in this chart.
The Total Impulse selector lets you limit the list to the range of motors you want to see. No point in listing E- through O-impulse motors for A simple model rocket: they won't fit (and most of them would tear the rocket to shreds if they did).
The Motor Dimensions gadgets let you further filter the list to only motors that have the desired mechanical fit in your rocket. There's no point in trying to fit a motor that is larger diameter than your motor mount tube, though it's quite common to search for motors that are smaller than the maxim motor diameter for a given rocket, and use an adaptor to bring the motor up to size for the right mechanical fit.
The motor you select on this page has a characteristic mass, and other characteristics which affect both your simulation, and the total weight and center of mass of your rocket as shown on the Rocket Design page. From that page, you can select any of your configurations to see the effect on weight and stability.
Ejection charge delay
Finally, to Ejection charge delay. One of the very common uses for OpenRocket simulations is to determine how long a delay a motor must have for a successful flight. Too early or too late and the rocket could try to open the chute while it's moving quickly, causing damage. Way too late or not at all, and the rocket will crash.
Ejection charge delay will have a list of available off-the-shelf ejection charge delays for the motors in the list, but it's also a free-text field, where you can enter a particular delay in seconds.
Some motors allow the flyer to pick a standard delay time, and offer tools to reduce the delay. For example, the AeroTech RMS motors might offer a 10-second delay, but their delay drilling tool allows the flyer to remove 8, 6, 4, or 2 seconds from this delay time. Other types of motors offer their own methods.
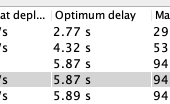
In the case of adjustable delays, typically you'll set the Ejection charge delay iteratively: You start by selecting a motor, then choose one of the Ejection charge delay choices from the menu, then run the simulation. The simulation results will show you the Optimum delay in seconds. You then can return to your motor selection page, and enter that optimum delay, or as near as you can come to it with the tools at your disposal, in the Ejection charge delay field.
Even if your delay is not adjustable, you'll probably want to look at the Optimum delay field and pick a motor with the delay closest to what your simulation says you'll need for success.
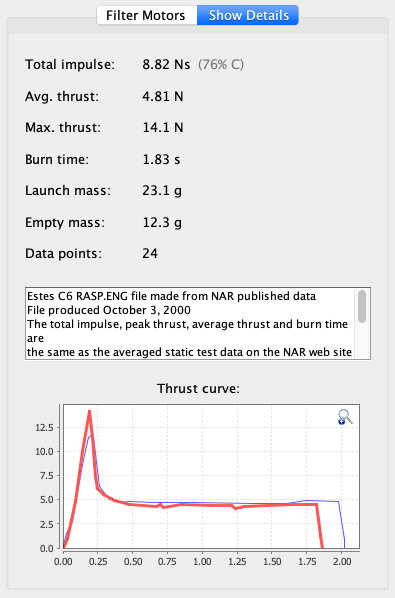
Show Details
The Show Details section gives you detailed information about the selected motor's thrust curve, its thrust and burn parameters, and its certification.
Getting a Good Simulation
OpenRocket simulates an ideal rocket flying in an ideal virtual world. It's a model of how a rocket interacts with the physics of the real world. As a model, it's useful, but imperfect. OpenRocket's sim can vary from reality due to many things, for example:
- Local air density at launch time (a function of local temperature and barometric pressure)
- Manufacturer variations in motor components
- Imperfect match between launch angle or heading from simulation
- Local wind speed, direction, gust mismatch from simulation
- Varying wind speed at altitude, or wind shift during flight
- Performance under stress of real-world components (fin flutter, etc.)
- Imperfect match of simulated model to real model
That, again, is not an exhaustive list, but the last item: Imperfect match to real model counts for a lot.
It's probably obvious that you have to get the simulated model's weight right to get a good simulation, but what about its weight distribution? What about its diameter, the match of its nose cone and fin profile to the actual model? Even the texture of surface components can cause variation in drag as the rocket flies.
Constructing an accurate digital model
While you can do OK with matching the weight and center of mass of your OpenRocket model to your real rocket, your best simulations will come from building the simulated model before you build the actual rocket. To get the most accurate model, you should weigh every component. And once components are assembled, you should weigh each section to check your work, comparing it to OpenRocket's calculated masses (glue, filler and finishes add weight, too).
A digital kitchen scale can be useful to weigh each part as you create a simulation of all the parts of your rocket. You'll also need to measure thicknesses and lengths. You can obtain inexpensive digital calipers which are fine for this measuring purpose, from suppliers like Harbor Freight.
Working in the Rocket design window, measure and record the weight of each component as you model it. Try and choose the correct material to reflect the density and mass of the actual component. Often, creating a more-correct material (using the "Custom" option of the Component Material menu) is a better choice than using weight overrides, because the weight override may not reflect the correct center of mass of the overridden material.
Include every component the actual rocket uses, except for the motor: motors are set in the Motors & Configuration tab. If a part is too light to weigh, weigh multiples of the part, and divide by the number you weighed. If you need to weigh a short bit of shock cord, weigh 20 feet of it, divide by 20 to get the weight of 1 foot.
Starting with a downloaded model
If you begin a model with a downloaded OpenRocket (.ork) or RockSim (.rkt) file (OpenRocket can open both), check that the downloaded file's components match your own, and that the specified weight and center of mass match those of your own model. Often, downloaded files feature mass overrides to get the center of mass of an imperfect OpenRocket model to agree with that of a real-world rocket. These overrides may get the rocket's weight distribution all wrong, so it's important to adjust the downloaded model to match your rocket exactly.
Expectations on simulation accuracy
A very good simulated design can go a long way to predicting the correct eject delay and altitude as-flown.
The better your model, the better the prediction, though note that this author finds that OpenRocket predicts a bit more altitude than you'll attain most of the time (an average of 29% more in an informal calculation of a dozen of my logged flights - though the variance ranged from dead-on to 43% off).
