Difference between revisions of "Basic Flight Simulation"
m |
|||
| Line 29: | Line 29: | ||
==The Flight Simulations Window== | ==The Flight Simulations Window== | ||
| − | Below you'll see a picture of the <strong>Flight Simulations</strong> window. We're using the <em>A Simple Model Rocket</em> example here, and it includes the list of simulations pictured.<br /> | + | Below you'll see a picture of the <strong>Flight Simulations</strong> window. We're using the <em>A Simple Model Rocket</em> example here, and it includes the list of simulations pictured. <br /><br /> |
| − | [[File:SimOverview.png|thumb|800 px|center|The <em>Flight Simulations</em> window.]] | + | [[File:SimOverview.png|thumb|800 px|center|The <em>Flight Simulations</em> window.]] <br /> |
| − | In the Flight Simulations window, you'll see the simulations listed, initially in Name order. Note that the second column is "Configuration" - the name of the configuration used in the sim, usually named for the rocket motor used in that configuration. The remaining values in the simulation's row are calculated by "running" the simulation. You can run one simulation by selecting a sim and clicking the <strong>Run simulations</strong> button: <br /> | + | In the Flight Simulations window, you'll see the simulations listed, initially in Name order. Note that the second column is "Configuration" - the name of the configuration used in the sim, usually named for the rocket motor used in that configuration. The remaining values in the simulation's row are calculated by "running" the simulation. You can run one simulation by selecting a sim and clicking the <strong>Run simulations</strong> button: <br /><br /> |
| − | [[File:RunOne.png|thumb|800 px|center|Running One Simulation.]] | + | [[File:RunOne.png|thumb|800 px|center|Running One Simulation.]] <br /> |
| − | ...or run them all at once by selecting more than one...<br /> | + | ...or run them all at once by selecting more than one...<br /><br /> |
| − | [[File:RunAll.png|thumb|800 px|center|Running <em>All</em> Simulations.]] | + | [[File:RunAll.png|thumb|800 px|center|Running <em>All</em> Simulations.]] <br /> |
...or run them in any combination you choose. Below you'll see the <em>Simulation Results</em>. Note that the indicator at each simulation has turned green, and that beside every working simulation, you'll see a check mark. | ...or run them in any combination you choose. Below you'll see the <em>Simulation Results</em>. Note that the indicator at each simulation has turned green, and that beside every working simulation, you'll see a check mark. | ||
| − | Note also that Simulation 3 has an <em>exclamation point</em> instead of a check mark. This is because the simulation reveals that the motor delay is so short that the rocket will be moving very fast when the parachute comes out. This will usually cause severe damage to a rocket - called a "<em>zipper</em>", where the pulled-taut shock cord cuts a rough slot in the tube as the chute deploys while the rocket continues to move rapidly forward. <br /> | + | Note also that Simulation 3 has an <em>exclamation point</em> instead of a check mark. This is because the simulation reveals that the motor delay is so short that the rocket will be moving very fast when the parachute comes out. This will usually cause severe damage to a rocket - called a "<em>zipper</em>", where the pulled-taut shock cord cuts a rough slot in the tube as the chute deploys while the rocket continues to move rapidly forward. <br /><br /> |
[[File:SimResults.png|thumb|800 px|center|Simulation Results.]] <br /> | [[File:SimResults.png|thumb|800 px|center|Simulation Results.]] <br /> | ||
| Line 56: | Line 56: | ||
</ul> | </ul> | ||
| − | These are common failure conditions, but are not intended to be an exhaustive list. | + | These are common failure conditions, but are not intended to be an exhaustive list. <br /> |
| + | |||
| + | ==Getting a Good Simulation== | ||
[[File:PlotExportButton.png|thumb|800 px|center|The <em>Plot/Export</em> Button.]] <br /> | [[File:PlotExportButton.png|thumb|800 px|center|The <em>Plot/Export</em> Button.]] <br /> | ||
Revision as of 05:04, 7 January 2021
|
The current User's Guide is very much a work in progress, any help would be greatly appreciated! |
Basic Flight Simulation
In this section we'll take a quick look at running a basic Flight Simulation.
Simulations are often used by mid- and high-power rocketeers to determine what altitude a rocket and motor combination will attain, in order to keep it below the maximum launch waiver altitude, or below cloud cover, or just so it won't disappear miles downwind on the breeze.
They're also often used to determine how long an ejection delay needs to be, if you're using motor ejection.
You may not have simulated flights on your Estes A, B and C motors, but once you start buying and assembling some of the many motors you could choose for mid- or high-power rocketry, you'll need to simulate regularly.
OpenRocket can do the basic simulations for altitude, velocity off the rod/rail, optimum delay with just a few clicks. But if you'd like to get more deeply into simulation, OpenRocket can graph flight parameters, take local wind speed and direction into account, and a lot more.
If you already know how run basic simulations, you can jump to the next section.
The Flight Simulations Window
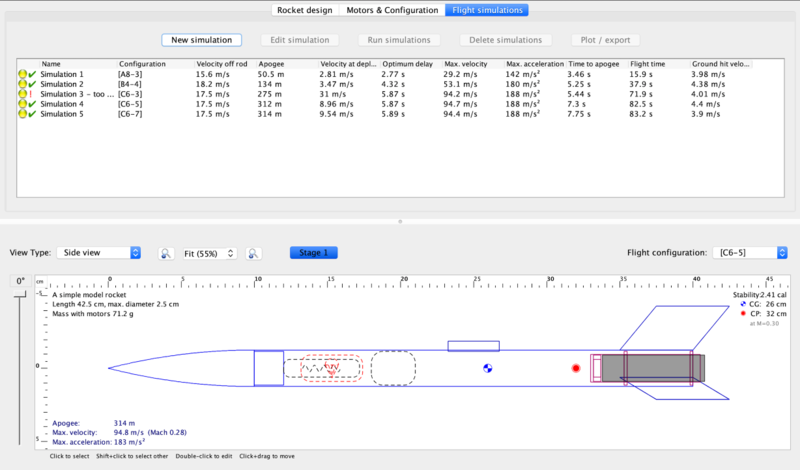
Below you'll see a picture of the Flight Simulations window. We're using the A Simple Model Rocket example here, and it includes the list of simulations pictured.
In the Flight Simulations window, you'll see the simulations listed, initially in Name order. Note that the second column is "Configuration" - the name of the configuration used in the sim, usually named for the rocket motor used in that configuration. The remaining values in the simulation's row are calculated by "running" the simulation. You can run one simulation by selecting a sim and clicking the Run simulations button:
...or run them all at once by selecting more than one...
...or run them in any combination you choose. Below you'll see the Simulation Results. Note that the indicator at each simulation has turned green, and that beside every working simulation, you'll see a check mark.
Note also that Simulation 3 has an exclamation point instead of a check mark. This is because the simulation reveals that the motor delay is so short that the rocket will be moving very fast when the parachute comes out. This will usually cause severe damage to a rocket - called a "zipper", where the pulled-taut shock cord cuts a rough slot in the tube as the chute deploys while the rocket continues to move rapidly forward.
OpenRocket can detect several conditions which will mark a simulation as non-working. For example:
- Too slow off launch rod - unstable launch
- Too short a delay - early deploy of chute, zipper, damage or separation likely
- Too long a delay - late deploy of chute, zipper, damage, separation or hard ground-hit likely
- Ground-hit velocity too high - damage, and potential danger to ground personnel
These are common failure conditions, but are not intended to be an exhaustive list.
Getting a Good Simulation
