Difference between revisions of "Downloading & Installing"
m (Minor punctuation and grammar fixes. Also added Linux terminal command for determining Java version, in case the user's browser doesn't have a supported plugin.) |
m (Fixed main menu numbering.) |
||
| Line 7: | Line 7: | ||
{{UserGuideHelp}} | {{UserGuideHelp}} | ||
| + | ==2. Downloading & Installing== | ||
__TOC__ | __TOC__ | ||
Revision as of 00:56, 14 September 2015
|
The current User's Guide is very much a work in progress, any help would be greatly appreciated! |
2. Downloading & Installing
OpenRocket is a Java application, which means that you need to have Java installed on your computer before you can use it. OpenRocket requires Java Version 6 or better to run, you can check which version of Java is installed on your computer by clicking here. If Java is not installed, that page should provide you with a link to download and install the latest version for your operating system. If that page tells you that you do not have a supported plugin, then you can still determine your Java version from the command line:
java -version
If you see information about a specific version of Java listed on the first line of the output after that command, then you have Java installed. Otherwise the output should tell you which packages contain Java for your particular distribution of Linux. Some operating systems come with Java pre-installed, while others don't. The installation processes for Windows, Mac OS X and Linux are shown below.
General
In general, OpenRocket is installed by following these three steps:
- Make sure you have the correct version of Java, and install or upgrade if not.
- Download the OpenRocket application.
- Open the application and use it. On most operating systems you can just double-click the icon for the OpenRocket file which was downloaded, no further installation is required.
Windows Users
Windows does not come with any sort of Java pre-installed. However, it's quite likely that Java has already been installed as part of another application, and you can check this by using this page. If you don't have Java installed, you will need to download and install it before continuing.
Once you have Java, installing OpenRocket on any version of Windows is simple:
- Download OpenRocket to the folder of your choice.
- Double click the file to start the program.
That's it! If you didn't save the OpenRocket file to your Desktop, you can place a shortcut there by right-clicking on the OpenRocket file, mousing over "Send to" and clicking "Desktop (create shortcut)".
Mac OS X Users
If your computer runs OS X 10.7.2 or older version, then it receives Java updates from Apple. Apple sends out Java with system updates, so it should already be installed. A common complication with Mac users is that most Macs have both Java 5 and Java 6 installed, and Java 5 is used by default. If you try to use OpenRocket and get an error, then you probably still have Java 5 set as the default.
To set Java 6 as the default:
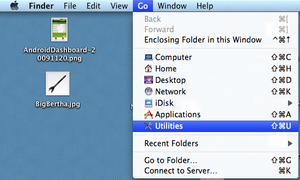
- Open the Utilities folder (Finder -> Go -> Utilities).
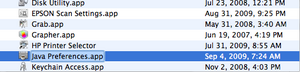
- Open the Java Preferences Application (double-click Java Preferences.app).
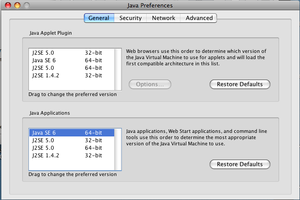
- In the bottom section of the window that opens, drag Java 6 to top of list.


If your Mac runs OS X 10.7.3 (Lion) or later version, then the updates are delivered directly by Oracle and you should not encounter any problems.
For more information on software versions and updates, visit Java on Mac OS X page of the Oracle official web site.
Linux Users
Ubuntu/Debian Repository
If you are running a recent version of Ubuntu or Debian, then OpenRocket can be easily installed using the Ubuntu Software Center or Synaptic (etc.). Please note that the version in the distribution repository may not be the latest version. Alternatively you may install OpenRocket from the command line:
sudo apt-get install openrocket
To start OpenRocket, simply select it from the Applications menu.
Official Version
- Download the OpenRocket application.
- Copy it to a convenient folder.
- Make the .jar file executable (right-click on .jar file, select "Properties", go to the Permissions tab and check the "Allow executing file as program" box).
- Start OpenRocket by either double-clicking the .jar file, or right-clicking the .jar file, and selecting "Open with Sun Java6 Runtime".
If the default is set to open with the Archive Manager, then right-click, select "Open with other application", then select "Open with Sun Java6 Runtime", and check the box to make that the default. In future, it should be possible to just double-click to start OpenRocket.
Alternatively you may start OpenRocket from the command line:
java -jar OpenRocket-14.06.jar
Or, if you are not currently in the same directory as the .jar file, replace '/path/to/' by the appropriate path on your system:
java -jar /path/to/OpenRocket-14.06.jar