FAQ
|
The current User's Guide is very much a work in progress, any help would be greatly appreciated! |
This page lists various frequently asked questions. Most of these are categorized as "How to" questions for various design issues.
Problems running OpenRocket
When will OpenRocket run on a newer version of Java?
Both Version 15.03 and the OpenRocket 22.02 Beta version are available by way of a packaged installer, and the use of an installer package is strongly recommended. The packaged installer contains the correct version of Java for use only with that version of OpenRocket.
For those users who still wish to use a .jar version of OpenRocket, the Java version installed on your device is critical to the proper function of OpenRocket.
1. OpenRocket 22.02 Beta requires the most recent release of Java 11 LTS to function correctly, without special instructions that allow Java 17 to function correctly as well.
2. OpenRocket 15.03 requires the most recent release of Java 8 LTS to function correctly.
Again, the use of an installer package is strongly recommended. And, by utilizing a packaged installer, your ability to continue to use OpenRocket reliably will be preserved. Moreover, utilizing the packaged installers allows you to use both OpenRocket 15.03 and OpenRocket 22.02 Beta simultaneously, if you wish.
Java 17
For those using OpenRocket .jar files with Windows, OpenRocket Beta 5 and above will function with Java 17 LTS, but not without using a special instruction to start OpenRocket. If you are such a user, you may start OpenRocket using Java 17 by executing the following instruction:
java --add-exports=java.base/java.lang=ALL-UNNAMED --add-exports=java.desktop/sun.awt=ALL-UNNAMED --add-exports=java.desktop/sun.java2d=ALL-UNNAMED -jar OpenRocket.jar
This instruction must be executed from within the directory in which the OpenRocket.jar file resides.
Starting OpenRocket with Java 17 from a Command Prompt
Go to the file directory where OpenRocket.jar resides, then open a command prompt. Now type (or copy and paste) the instruction above on the command line and click enter. A command prompt window will then open, and OpenRocket will start and be ready to use, but the command prompt window must be manually closed.
Starting OpenRocket with Java 17 from a Desktop Shortcut (Recommended)
For those running OpenRocket using a Desktop shortcut, you may simply open the OpenRocket shortcut's properties and replace the "Target" text with the above instruction (copy and paste to the “Target” line). After that, when the shortcut is used, a command prompt window will open, OpenRocket will start, and the command prompt window will close on its own, leaving OpenRocket open and ready to use.
Fixes that may work when OpenRocket 22.02 Beta is not functioning.
Lenovo Devices
Two users, both with Lenovo devices running Windows 10, were unable to get OpenRocket to function correctly. The first user could not get the 3D finished and unfinished views to work, and the second user could not open a component edit window from the component tree or otherwise (after initial installation). Bother users utilized the packaged installed and the second user did not have Java installed on the device.
As to the second, the user installed Java 8 (believing that version was correct for OpenRocket 22.02 Beta), without any resulting change in functionality. But, after the user uninstalled Java 8, and installed Java 11 LTS, OpenRocket functioned correctly, without any other anomalous behavior. Why this fix worked has not been explained where the packaged installer contains the same version of Java.
The issue the first user is experiencing is still under review.
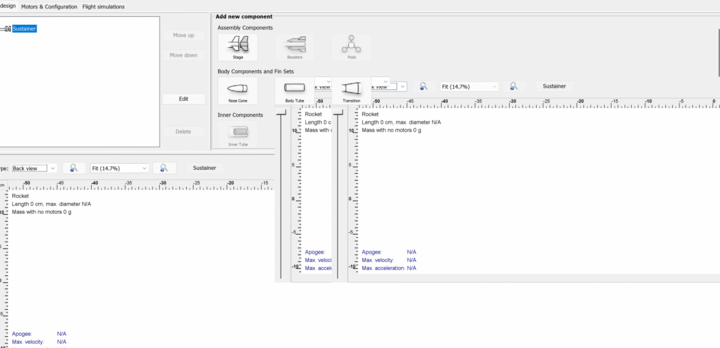
Windows Graphics Settings
One user reported the screen layering shown below:
| ' |
The user resolved this issue by switching the Graphical settings from NVIDIA to Intel Integrated.
How do I associate my .ork files with OpenRocket.exe in Windows?
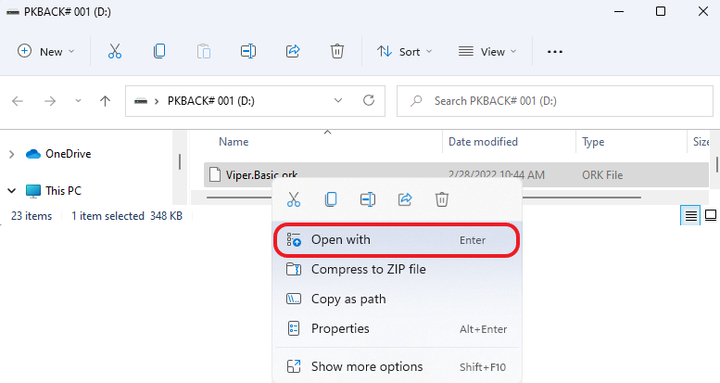
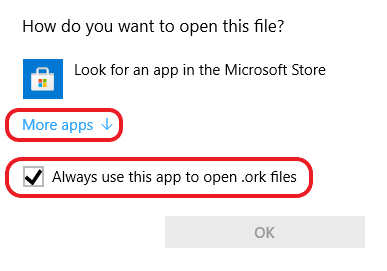
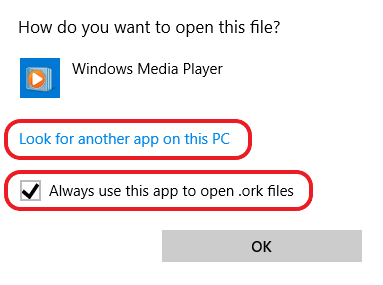
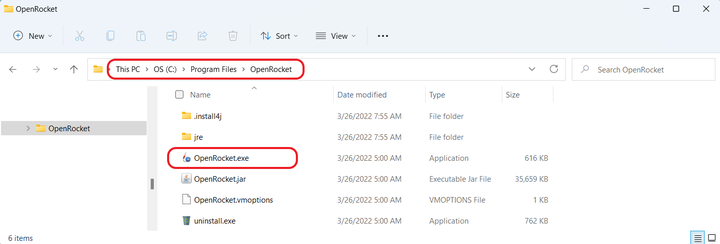
If you used the Beta 22.02 installer, the following steps will associate the .ork design file extension with the OpenRocket.exe application.
| Navigate to file | Navigate to an existing .ork file saved on your device. ' |
|---|---|
| Select Open with | Left-click on an existing .ork file and choose Open with to open the application chooser ' |
| Select More apps | Make sure the Always use this app to open .ork files box is checked, then select More apps option. ' |
| Select Look for another app... | Select Look for another app on this PC. ' |
| Navigate to OpenRocket.exe | In the pop-up file directory, navigate to where OpenRocket.exe is installed, then double-left-click on that application; DO NOT select OpenRocket.jar. ' |
| File association complete | You should now see the OpenRocket icon just before .ork file types. ' |
Questions and Answers
What's the effect of the fin cross-section shapes?
OpenRocket features three fin cross-section choices: (1) square, (2) rounded, and (3) airfoil, but doesn't actually simulate airfoils. OpenRocket assumes "square" fins, then adjusts the pressure and base drag based on the selected fin profile. The pressure drag of the "rounded" profile is less than that of the "squared" profile, and "airfoiled" profile has the same pressure drag as that of the "rounded" profile, but no base drag.
Why does my phantom body tube outer diameter change when I open a saved design?
Why it happens:
In OpenRocket versions 22.02.beta.05 and earlier that featured an automatic outer diameter option in the component configuration pane, the automatic outer diameter option was available even when there wasn't a component with a diameter to reference. After the release of OpenRocket 22.02.beta.05, this was changed so that the outer diameter automatic option is only available when there a component to which the outer diameter can be referenced. If you saved a design using OpenRocket 22.02.beta.05 or an earlier version, and that design contained a component which had the automatic outer diameter checked, but for which that option is no longer allowed, the outer diameter of that component may change to the default diameter. So far, this issue appears limited to designs featuring pods with phantom body tube sub components.
What to do:
If you are experiencing this issue, merely open the design, set the outer diameter of the affected component to the desired value, and re-save the design. The design should then reopen without changing the outer diameter of a previously affected component.
Why can't I always cut and paste between two designs?
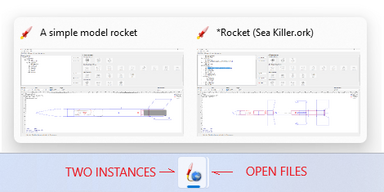
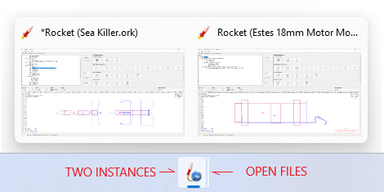
The cut and paste feature in OpenRocket utilizes a private clipboard, not the system clipboard to store the copied information. Because of this, you can only copy and paste between designs that are opened under the same instance of OpenRocket.
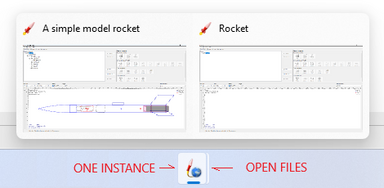
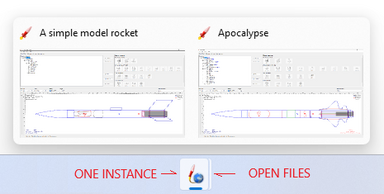
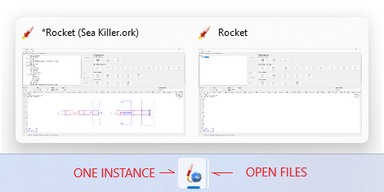
So, what does "opened under the same instance" mean? Using Windows, here are a few examples:
| Examples of One Active Instance of OpenRocket | What You See | |
|---|---|---|
| Example 1 | Start OpenRocket and open an existing design (.ork) file, then left-click on the File tab and select New, to start a new design. On the Task Bar, you will see one instance of OpenRocket, and, if you hover on that icon, you will see the files open in that instance of OpenRocket. | |
| Example 2 | Start OpenRocket and open an existing design (.ork) file, then left-click on the File tab and select Open (opening a second design (.ork) file. On the Task Bar, you will see one instance of OpenRocket, and, if you hover on that icon, you will see the files open in that instance of OpenRocket. | |
| Example 3 | Double-left-click on an existing design (.ork) file to start OpenRocket with that design open, then left-click on the File tab and select New, to start a new design. On the Task Bar, you will see one instance of OpenRocket, and, if you hover on that icon, you will see the files open in that instance of OpenRocket. | |
| You CAN cut and paste between the examples shown above, because only one instance of OpenRocket is active. |
| Examples of Two Active Instances of OpenRocket | What You See | |
|---|---|---|
| Example 4 | Start OpenRocket and open an existing design (.ork) file, then double-left-click on a different existing design (.ork) file to open that design. Even though the Task Bar looks the same, there are actually two active instances of Open Rocket. | |
| Example 5 | Double-left-click on an existing design (.ork) file to start OpenRocket with that design open, then double-left-click on a different existing design (.ork) file to open that design. Even though the Task Bar looks the same, there are actually two active instances of Open Rocket. | |
| You CANNOT cut and paste between the designs shown in Example 4 and Example 5 because those designs are in two different instances of OpenRocket. |
Why don't my flight simulations re-run automatically when I make changes to my components?
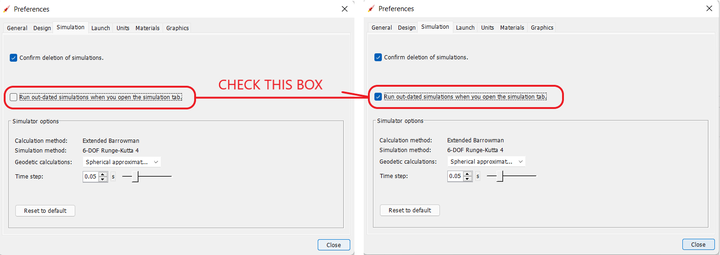
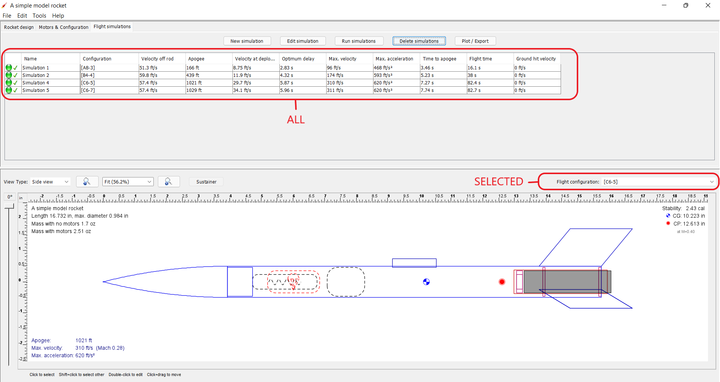
When you make a design change that affects flight simulations, OpenRocket gives you the choice between running only the outdated flight simulation for the motor you have selected, or running all outdated flight simulations. To run all of the outdated flight simulations, check the box shown below.
| Edit → Preferences → Launch | |
| Selected vs. All |
Although OpenRocket performs this task quickly (mostly in the background while you are doing other things), if you have a large number of motors with a complex design, then you may experience a short delay as all of the flight simulations run.
Why don't my existing flight simulation results change when I change my "Launch" preferences?
To allow users to change components, recovery options, and even motors without changing their simulation launch conditions, when you run a flight simulation, the launch preferences selected at that moment attach to that flight configuration until manually changed. This also allows you to create, update, and compare different launch conditions (such as different launch guide lengths and even different launch location characteristics) without losing your settings when simulations are re-run.
Changing Launch Conditions of Existing Flight Configurations
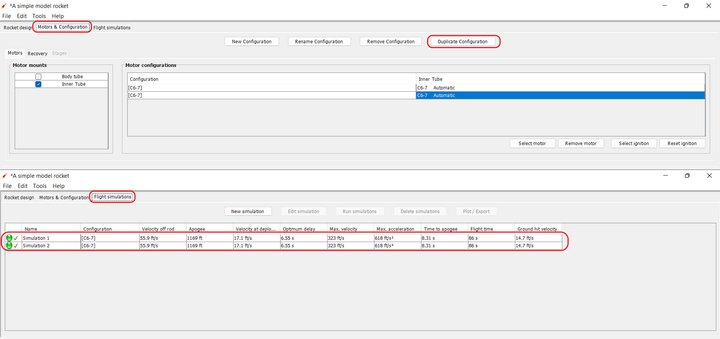
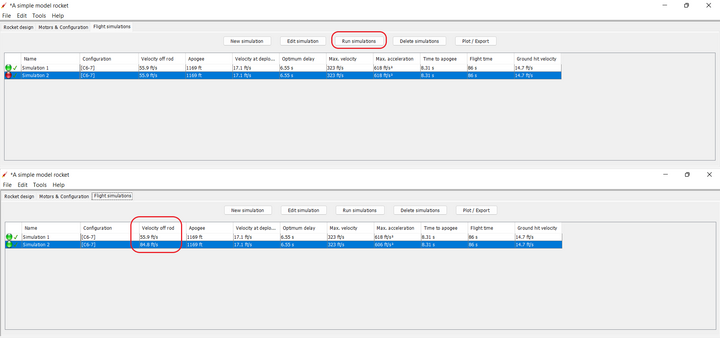
To change and compare launch conditions, duplicate a flight configuration, edit one of the configuration launch conditions, then re-run and comopare the results.
| Create Duplicate Flight Configurations |
Double right-click the simulation being changed...
| Change Launch Rod Length | |
| Re-Run Simulation |
And, compare the results.
Why are my ground-hit velocities so inaccurate, so high?
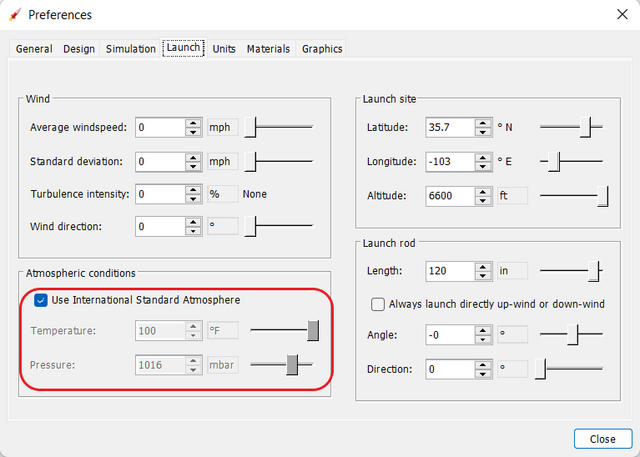
OpenRocket uses atmospheric conditions to simulation the rocket desent rate and ground hit velocity. And, each individual simulation has its own atmospheric conditions settings. The most common indicator that your atmospheric conditions settings may be incorrectly set is when one motor appears to have the correct ground-hit velocity and other motors show ground hit velocities that are much higher than expected, even 10 times higher.
Your atmospheric conditions settings may be adjusted on the Edit → Preferences → Launch tab, in the Atmospheric conditions section.
| Edit → Preferences → Launch |
But, unless you are very familiar with how atmospheric conditions affect flight parameters, and have access to the correct atmospheric data, you should always check the Use International Standard Atmosphere box.
Using OpenRocket
Motors
How do I use motor configurations?
OpenRocket uses the notion of motor configurations for rocket designs. Each motor configuration corresponds to a configuration you are planning on launching your rocket with. For example for a simple small rocket you could define three configurations, one using an A8-3 motor, one using a B4-4 motor, and one using a C6-3 motor. For a multi-stage or clustered rocket you can define and experiment with many other motor configurations easily and switch between them. You can define any number of motor configurations for a rocket design.
In the rocket design window, you can select which motor configuration is displayed in the figure by the dropdown labeled Motor configuration. Every design has a configuration named [No motors] in addition to the user-defined configurations, which contains no motors.
You can configure all aspects of motor configurations in the Edit motor configurations dialog. It can be opened from any motor configuration selector.
How do I define motors?
Defining motors and simulating using them in OpenRocket requires three steps: defining which components function as motor mounts, defining the different motor configurations, and defining which motor configuration to use in a particular simulation.
OpenRocket supports attaching motors in either body tubes or inner tubes. To make a component be a motor mount, open the configuration dialog for that component, move to the Motor tab and tick the box This component is a motor mount. After that you can select motors for different motor configurations on the same tab. See #How to use motor configurations? for details on motor configurations.
Last, when you create a new simulation, you need to select which motor configuration it uses. This is done from the Motor configuration dropdown of the Launch conditions tab. The default motor configuration is the currently selected configuration of the design figure.
How do I add motors to the database?
You can define external files to be loaded into the thrust curve database. There are two ways to add the files:
- Copy the files to the OpenRocket configuration directory. This is environment-specific:
| Windows: | C:\Documents and Settings\username\Application Data\OpenRocket\ThrustCurves\ or
C:\Users\username\AppData\Roaming\OpenRocket\ThrustCurves (typical) |
| Linux: | ~/.openrocket/ThrustCurves/ |
| Mac OS X: | ~/Library/Application Support/OpenRocket/ThrustCurves/ |
OR
- Instruct OpenRocket to load the files from another location. This can be done on the "Options" tab from the preferences.
Thrust curves can be loaded from RASP motor files (.eng), RockSim engine files (.rse) or ZIP archives containing the same.
How do I create a clustered rocket?
Clusters can be created using the Cluster tab of an Inner tube. This allows you to cluster the inner tubes in various configurations, distances and angles. The motor selected for the inner tube will be used for all the inner tubes in the cluster, and any components (such as engine blocks) attached to the inner tube will be replicated for all of the inner tubes.
If you need more fine-grained control on what components are in which tubes, you can create the cluster this way and then split the cluster into individual components by clicking Split cluster. You can then modify the individual components of the cluster. Note that you cannot re-assemble a split cluster (except with undo).
Note that you can create clusters of clusters by attaching inner tubes to other inner tubes, but the motors attached to such configurations will not be counted up correctly! This is a known bug that will be addressed in later versions.
The cluster techniques can also be combined with a staged rocket.
Pods
How do I create external pods to the rocket?
Beta 2022 introduced pods as a design element. Upon starting OpenRocket, you will see three assembly component icons: stage, boosters, and pods. At this time, pods may only be attached to a body tube, and, unless a body tube is selected, the pod icon will be greyed out.
| Opening Screen | |
| Body Tube Attachment |
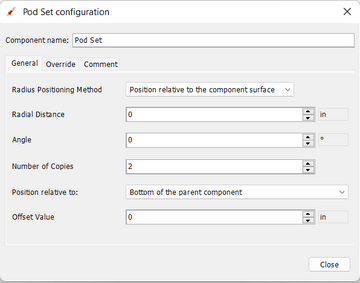
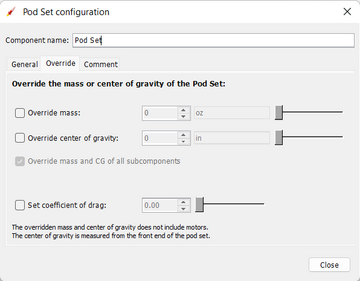
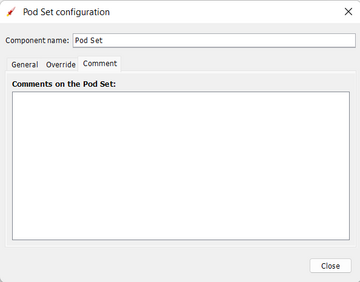
After a body tube is created, pods may be attached to that tube. Pods feature three component tabs for use in defining and describing the pod being created.
| General Tab | |
| Override Tab | |
| Comment Tab |
As with the use of other components, OpenRocket assumes that you are using generally accepted design principles and methods. Pods are not intended to simulate design concepts that are unrelated to what can be done in real life. For example, a pod should not be used on the rear-most body tube to put a nose cone on the top of the rocket. And, pods should not be used to put two sets of fins on the same body tube (a second set of fins should be added onto that body tube). Using pods in a manner outside of what is generally accepted will result in inaccurate aerodynamic analysis and potentially unstable designs.
Please keep in mind, just because OpenRocket will allow unconventional pod uses for aesthetic purposes doesn't mean that what is being done should be done the way that it's being done, or that the unconventional use is being aerodynamically modeled accurately.
Staging
How do I create a staged rocket?
First, the components belonging to different stages must be attached to separate stage components. You can add stages to the rocket by clicking the New stage button on the main design window. Stages are always used from the lowest to the highest, and when an upper-stage motor ignites all lower stages are automatically dropped off.
The motor ignition event can be selected on the Motor tab of the body tubes or inner tubes. The default is Automatic, which is suitable for small rockets, where the ejection charge of the lower stage lights up the upper stage motors. The lowest stage will be ignited at launch.
In larger staged rockets that don't have ejection charges the ignition event must be changed. The first stage to light up should ignite at Launch (or Automatic). If the latter stages are ignited by an onboard computer that detects deceleration, they should be set to First burnout of previous stage. (Note that this assumes the lower stage motors have equal burn lengths.) If the latter stage is ignited by a timer, the event should be set to Launch and a suitable delay added.
Each of the events can take an additional delay parameter. This allows taking into account for example the time for an ejection charge to light up the next stage or the time for an onboard computer to ignite the next stage. It can also be used for timed ignition, by setting the ejection event to Launch plus n seconds.
The staging techniques can also be combined with a clustered rocket.
Transitions
How do I attach fins to a transition?
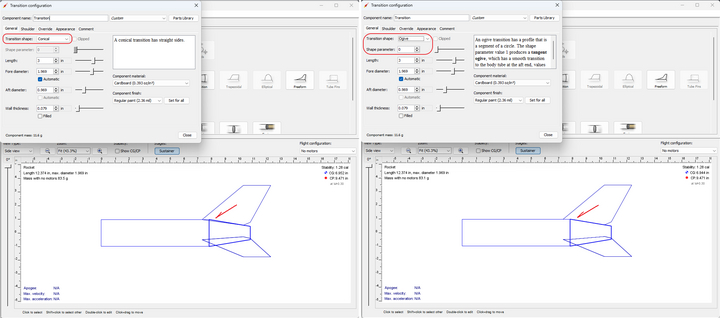
OpenRocket allows you to attach freeform fins to a transition, only freeform fins. And, OpenRocket processes a fin that is attached to a flat surfaced transition (e.g., a conical shaped transition) differently than when attached to transitions that can have a curved surface (e.g., ogive, ellipsoid, power series, parabolic, and haack shaped transitions). When a fin attached to a conical transition is processed, the fin's root chord is drawn as a straight line. When a fin attached to a transition capable of having a curved surface is processed, the fin's root chord follows the transition surface.
| Conical v. Ogive | |
|---|---|
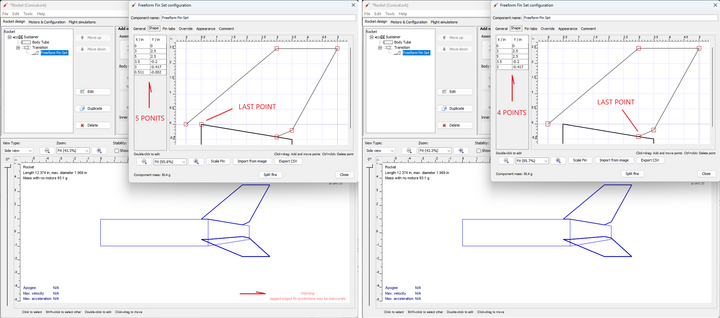
Because of this difference, conical shaped transitions should only have simple fins attached. Attaching a complex fin to a conical shaped transition causes a "jagged-edged fin" warning; simple means that the root chord of the fin is attached only to the surface of the transition.
If you want to attach a complex fin to a conical shaped transition, you need to select an ogive shaped transition and set the shape parameter to 0; this is an alternate method for creating a conical shaped transition. Using this technique will not cause a "jagged-edged fin" warning.
| Simple v. Complex | |
|---|---|
Other
What information is stored during automatic update checks?
When checking for updates, OpenRocket sends some non-personal information about the current installation. This information is used for statistical purposes (such as estimating what kind of load would be expected to thrustcurve.org when integrating with it, what Java versions should be supported, how much effort should be spent on parallelization, to what languages the software should be localized etc.) and also to quench the curiosity of the developers. We don't get any payment for the work we do, so knowing how much the software is used may help in motivating further development.
The information stored during the checks are:
- The OpenRocket version and build source (default JAR file or some Linux distribution for instance)
- A randomly-generated ID for the installation (does not contain any information about the user or system)
- The operating system name and computer architecture
- The Java runtime vendor and Java runtime version
- The country and locale of the user
- The number of processors in the computer
- The time when the check was made
Note that the user's IP address is not stored with this information. The IP address is likely stored in the Sourceforge web access logs, but the developers do not have access to this information.
The automatic checks for updates can be disabled in the Options tab of the preferences dialog.
Where to ask FOR more information?
The best place to ask questions is the OpenRocket mailing list, where other people can also answer and see the answers.
Other contact information can be found on the contact info page.
