Difference between revisions of "Component Details"
m (→Comments) |
m (→Comments) |
||
| Line 108: | Line 108: | ||
| − | <p>The <i>Comments</i> tab is common to all components, regardless of class. To demonstrate the use of comments, the <i>A simple model rocket</i> example included with OpenRocket will be used. First, open the <i>A simple model rocket</i> example, left-click on the <i>Nose cone</i>, then left-click on the <i>Comments</i> tab.</p> | + | <p>The <i>Comments</i> tab is common to all components, regardless of class. To demonstrate the use of comments, the <i>A simple model rocket</i> example included with OpenRocket will be used. First, open the <i>A simple model rocket</i> example, left-click on the <i>Nose cone</i> in the component tree to open the <i>Nose Cone configuration window</i>, then left-click on the <i>Comments</i> tab.</p> |
[[File:OR.Components.Tab_Comments.01.png|frameless|800 px]] | [[File:OR.Components.Tab_Comments.01.png|frameless|800 px]] | ||
| + | |||
| + | <p>As you can see, the comments box is empty, as are all of the comments boxes in this example. <b>When you create a component in your design, the comments box will, by default, be empty.</b></p> | ||
| + | |||
| + | <p>So let's see how a comment works. In the comments box, type "Ogive shape" and then close the <i>Nose Cone configuration window</i>. Now hover your cursor over the different components in the component tree (except the <i>Nose cone</i>; as you pause over a component, a small pop-up window opens, displaying the name of the component and its mass. But, if you hover over the <i>Nose cone</i> in the pop-up you see the name and mass of the component on the first line <i><b>and</b></i> the text entered in the comment box beginning on the second line. And, if you change the component name, the component name change appears in the pop-up as well.</p> | ||
| + | |||
| + | [[File:OR.Components.Tab_Comments.04.png|frameless|800 px]] | ||
| + | |||
| + | <p>A comment can be used to identify part characteristics, part numbers, vendors, or anything else you want to know about the component without having to open the configuration window,or look in some other source to see.</p> | ||
<br> | <br> | ||
Revision as of 00:56, 28 February 2022
Overview
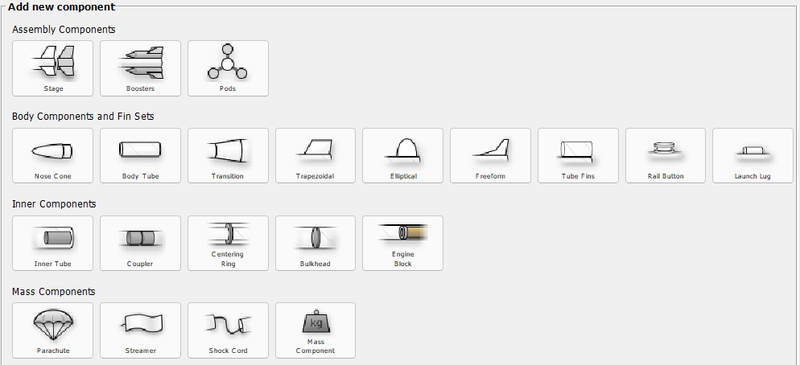
These are all of the components that you can expect to utilize when designing in OpenRocket, although individual components will be shaded until available for use with other compatible components.
Component Details -- OpenRocket 15.02
Component Classes
The components available in OpenRocket are divided into four classes based upon component function. These classes are assembly components, body components and fin sets (external components), internal components, and mass components (which include electronics and recovery components).
Assembly Components
The assembly components allow you to create individual or multiple stages, and to add boosters and even pods.
Body Components and Fin Sets Class
The body components and fin sets, including launch guides, allows you dramatic flexibility in designing rockets, from the most basic to the extremely complex. These components can be generally divided by purpose into three areas, components from which the outer airframe is made, the rockets fins, and the components that guide the rocket until it accelerates to a safe and stable speed.
Body Components
The body components consist of the parts that make up the outer airframe of a rocket; nose cones, body tubes, and transitions. Although the top of virtually every rocket is a nose cone, OpenRocket allows these components to be combined in virtually any order, from simple model rockets with just a nose cone and a body tube, to complex designs that feature multiple body tube in a variety of diameters, with transitions in-between.
Fin Sets
The fin sets components allow you to select fins from the traditional trapezoidal and elliptical shapes, to just about any shape you can think of by using the freeform fin set editor. And, with the click of a button, you can transform trapezoidal and elliptical fins to freeform so that you can easily change the look and feel of your fin sets. For those who favor ring fins, OpenRocket offers that option as well. And, you can mix and match fin types, such as having trapezoidal fins in-between ring fins.
Launch Guides
The launch guides components allow you to choose from launch lugs for low and mid power rockets to rail guides for your mid to high power needs. Although OpenRocket does not currently directly feature launch shoes, even that guide option may be simulated using the freeform fin set.
Inner Components
The inner components literally makes the rocket work, from the inside out; without these components there would be very little holding your rocket together; these components provide the surfaces necessary to glue the parts as the rocket is assembled. These components include such things as couplers to hold body tube together, bulkheads for avionics bay lids, inner tubes for baffles, centering rings to mount inner motor tubes, and engine blocks to keep the motor from going inside the rocket on launch; these components have many other uses when designing a rocket. Everything you need to construct the skeleton of the rocket.
Mass Components
The mass components allow you to stabilize your rocket by adjusting its center of gravity and even to get your rocket back to the ground safely. This component class includes parachutes and streamers, shock cords and quick links, some electronic components, and the ability to create just about any other component you may need or can think of.
Configuring Components
All components have characteristics that you can select from to customize your model. Some characteristics are unique to a specific type of component (whether a body tube is a motor tube for example). Other characteristics may apply to all components (every component has a color for example) This section relates to characteristics that are common to all, or at least the majority of components.
Overrides
Mass
Center of Gravity
Appearance Settings
Texture
Scale
Offset
Rotation
Color
Swatches
Other Palates
Shine
Comments
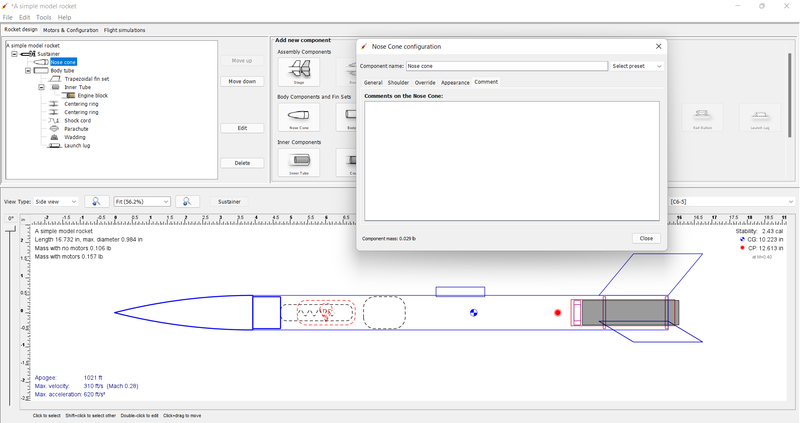
The Comments tab is common to all components, regardless of class. To demonstrate the use of comments, the A simple model rocket example included with OpenRocket will be used. First, open the A simple model rocket example, left-click on the Nose cone in the component tree to open the Nose Cone configuration window, then left-click on the Comments tab.
As you can see, the comments box is empty, as are all of the comments boxes in this example. When you create a component in your design, the comments box will, by default, be empty.
So let's see how a comment works. In the comments box, type "Ogive shape" and then close the Nose Cone configuration window. Now hover your cursor over the different components in the component tree (except the Nose cone; as you pause over a component, a small pop-up window opens, displaying the name of the component and its mass. But, if you hover over the Nose cone in the pop-up you see the name and mass of the component on the first line and the text entered in the comment box beginning on the second line. And, if you change the component name, the component name change appears in the pop-up as well.
A comment can be used to identify part characteristics, part numbers, vendors, or anything else you want to know about the component without having to open the configuration window,or look in some other source to see.


