Difference between revisions of "Assembly Components Basics"
Jump to navigation
Jump to search
Hcraigmiller (talk | contribs) |
m |
||
| (11 intermediate revisions by 2 users not shown) | |||
| Line 16: | Line 16: | ||
<tr> | <tr> | ||
<td>'''[[File:Components.01.01.Assembly.Stage.png|left|frameless|100 px|center]]'''</td> | <td>'''[[File:Components.01.01.Assembly.Stage.png|left|frameless|100 px|center]]'''</td> | ||
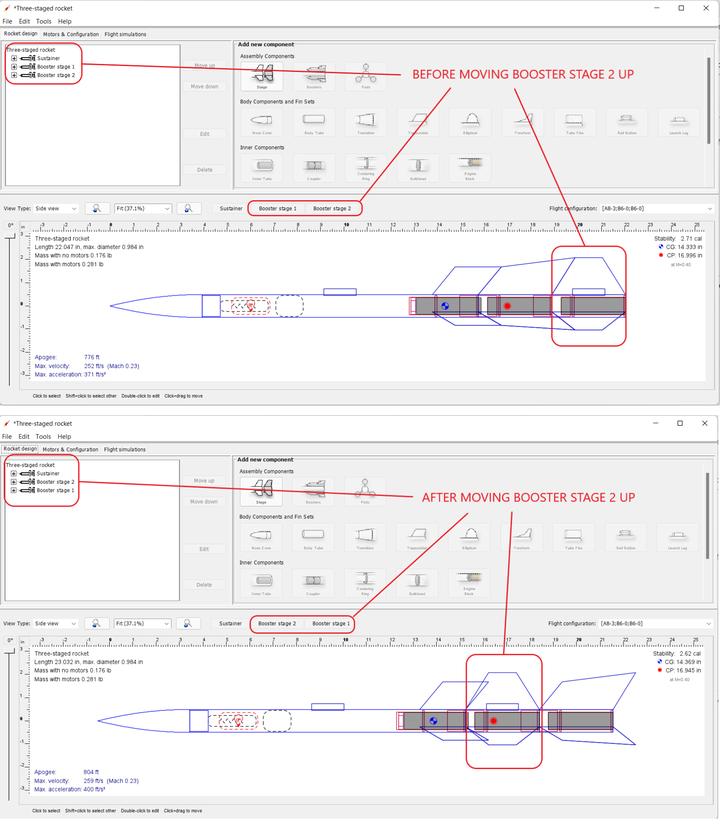
| − | <td> | + | <td>'''Stages:''' A rocket with a single motor is just that, a rocket. But, when you add another motor below the first, the part of the model containing the first motor is called a “sustainer” and the lower portion containing the second motor is called a “booster.” In version 15.03, these were denoted as “Stage 1" and Stage 2,” and these names could not be changed. Now OpenRocket not only allows you to rename stages, you can actually cut (or copy) and paste stages, or move them up and down. And, as you do, the names on the stage buttons change as well. You can even choose to turn stages on and off, making a stage visible or invisible. In the example below, the stages of a three-stage rocket have been changed to "Sustainer," "Booster stage 2," and "Booster stage 3."</td> |
</tr> | </tr> | ||
<tr> | <tr> | ||
<td></td> | <td></td> | ||
| − | <td | + | <td>'''[[File:Staging.01.03.ButtonsCombined.png|left|frameless|720 px|center]]'''<br>'''[[File:Staging.03.01.Buttons_Off.png|left|frameless|720 px|center]]'''</td> |
</tr> | </tr> | ||
<tr> | <tr> | ||
<td></td> | <td></td> | ||
| − | <td | + | <td>And, that is just a small sample of what you can now do with OpenRocket.<br></td> |
</tr> | </tr> | ||
<tr> | <tr> | ||
<tr> | <tr> | ||
<td>'''[[File:Components.01.02.Assembly.Booster.png|left|frameless|100 px|center]]'''</td> | <td>'''[[File:Components.01.02.Assembly.Booster.png|left|frameless|100 px|center]]'''</td> | ||
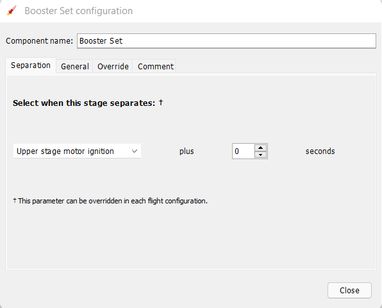
| − | <td> | + | <td>'''Boosters:''' A booster is actually treated as a separate second vehicle attached to the first. Booster vehicles can also separate from the primary vehicle upon the happening of a specific event. Whether the booster vehicle is powered, or a glider, is up to you and your ingenuity.</td> |
</tr> | </tr> | ||
<tr> | <tr> | ||
<td></td> | <td></td> | ||
| − | <td>'''[[File:Booster.01.02.png|left|frameless| | + | <td>'''[[File:Booster.01.02.png|left|frameless|382 px|center]]'''</td> |
</tr> | </tr> | ||
<tr> | <tr> | ||
<td></td> | <td></td> | ||
| − | <td>'''[[File:Booster.02.01.png|left|frameless| | + | <td>'''[[File:Booster.02.01.png|left|frameless|720 px|center]]'''</td> |
</tr> | </tr> | ||
<tr> | <tr> | ||
<td></td> | <td></td> | ||
| − | <td></td> | + | <td><br></td> |
</tr> | </tr> | ||
<tr> | <tr> | ||
<td>'''[[File:Components.01.03.Assembly.Pod.png|left|frameless|100 px|center]]'''</td> | <td>'''[[File:Components.01.03.Assembly.Pod.png|left|frameless|100 px|center]]'''</td> | ||
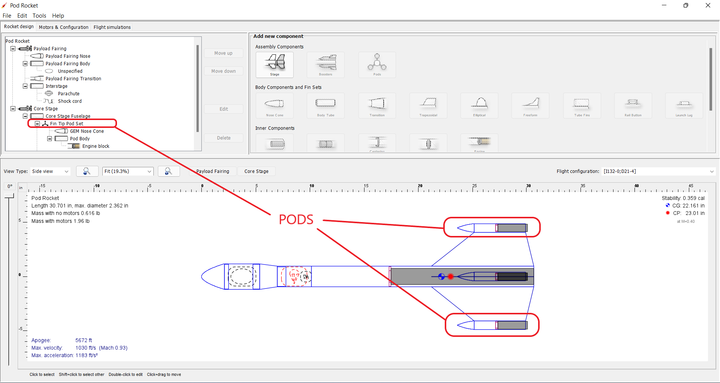
| − | <td> | + | <td>'''Pods:''' Those pod components are wonderfully crazy things that you can’t really see, but you can attach other components to. The example of the typical pod use can be seen in the ''Pod Rocket'' example that comes with OpenRocket. As you can see, assembled pod units can even have their own motors.</td> |
</tr> | </tr> | ||
<tr> | <tr> | ||
| Line 53: | Line 53: | ||
<tr> | <tr> | ||
<td></td> | <td></td> | ||
| − | <td | + | <td>Take that concept, throw in some paint and decals, and your own creativity, and pods can look like this.</td> |
</tr> | </tr> | ||
<tr> | <tr> | ||
| Line 61: | Line 61: | ||
<tr> | <tr> | ||
<td></td> | <td></td> | ||
| − | <td | + | <td>On the more extreme side, in the example below, phantom body tubes are attached to a pod and then fins are attached to the phantom body tube, then nest a another finned pod, and duplicate that (changing the angle), and this is what you can get.</td> |
</tr> | </tr> | ||
<tr> | <tr> | ||
| Line 69: | Line 69: | ||
<tr> | <tr> | ||
<td></td> | <td></td> | ||
| − | <td> | + | <td>'''A Word of Caution:''' With a little thought, experimentation, and planning, you can do almost anything using pods. The down side is that ''very unique designs may not simulate correctly''. When using pods, ''always independently <b>verify the stability</b> of your design''.</td> |
| + | </tr> | ||
| + | <tr> | ||
| + | <td></td> | ||
| + | <td><br><font color="red"><b>''A WORD OF WARNING'':</b></font color> Although pods can be used very creatively, <font color="red">'''pods are not intended to be used in a way that ''abandons basic design principles''</font color>'''. Using a simple rocket as an example, the nose cone is the first component, followed by a body tube and fins, with a pod attached, <b>''NOT''</b> a body tube with multiple attached pods, one of which is the nose cone. Except under circumstances that <b>''require''</b> otherwise (such as the Estes Trident), ''you should be able to remove the pods with a complete airframe remaining'', nose to tail. '''Just because you can do something, doesn't always mean you should.''' Safety first.</td> | ||
</tr> | </tr> | ||
| − | </table> | + | </table> |
<br> | <br> | ||
Latest revision as of 20:20, 21 March 2022
| Component | Function |
|---|---|
| Stages: A rocket with a single motor is just that, a rocket. But, when you add another motor below the first, the part of the model containing the first motor is called a “sustainer” and the lower portion containing the second motor is called a “booster.” In version 15.03, these were denoted as “Stage 1" and Stage 2,” and these names could not be changed. Now OpenRocket not only allows you to rename stages, you can actually cut (or copy) and paste stages, or move them up and down. And, as you do, the names on the stage buttons change as well. You can even choose to turn stages on and off, making a stage visible or invisible. In the example below, the stages of a three-stage rocket have been changed to "Sustainer," "Booster stage 2," and "Booster stage 3." | |
| And, that is just a small sample of what you can now do with OpenRocket. |
|
| Boosters: A booster is actually treated as a separate second vehicle attached to the first. Booster vehicles can also separate from the primary vehicle upon the happening of a specific event. Whether the booster vehicle is powered, or a glider, is up to you and your ingenuity. | |
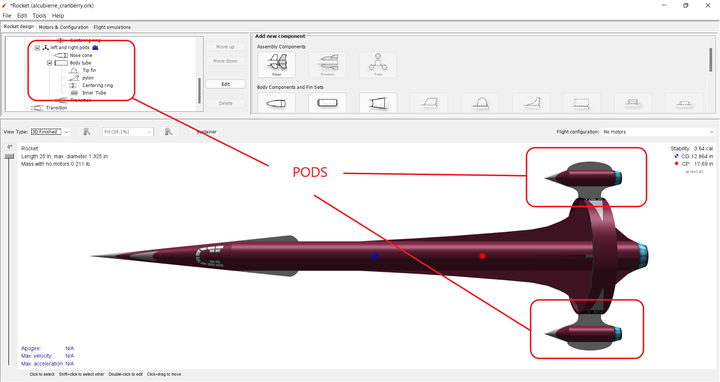
| Pods: Those pod components are wonderfully crazy things that you can’t really see, but you can attach other components to. The example of the typical pod use can be seen in the Pod Rocket example that comes with OpenRocket. As you can see, assembled pod units can even have their own motors. | |
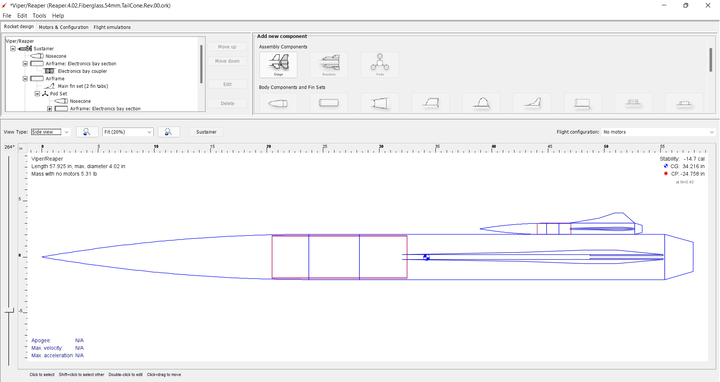
| Take that concept, throw in some paint and decals, and your own creativity, and pods can look like this. | |
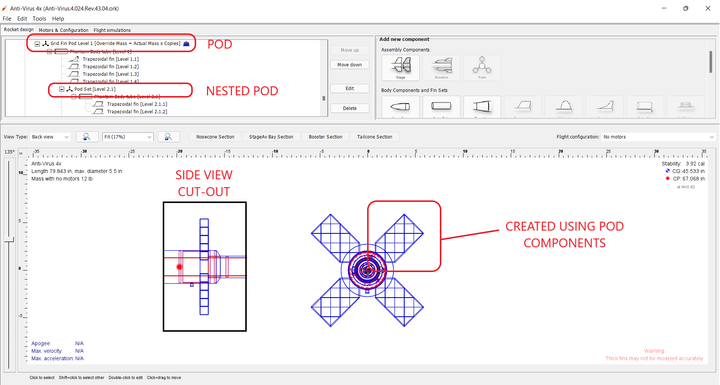
| On the more extreme side, in the example below, phantom body tubes are attached to a pod and then fins are attached to the phantom body tube, then nest a another finned pod, and duplicate that (changing the angle), and this is what you can get. | |
| A Word of Caution: With a little thought, experimentation, and planning, you can do almost anything using pods. The down side is that very unique designs may not simulate correctly. When using pods, always independently verify the stability of your design. | |
A WORD OF WARNING: Although pods can be used very creatively, pods are not intended to be used in a way that abandons basic design principles. Using a simple rocket as an example, the nose cone is the first component, followed by a body tube and fins, with a pod attached, NOT a body tube with multiple attached pods, one of which is the nose cone. Except under circumstances that require otherwise (such as the Estes Trident), you should be able to remove the pods with a complete airframe remaining, nose to tail. Just because you can do something, doesn't always mean you should. Safety first. |

